Aller au contenu
Service · Till

Run a full service on the till

From clocking in to the Z report: every button of the till explained, then everything to connect around it — printers, tills, card terminal, kitchen screens, kiosk, loyalty, bookings and online orders.

  • Tablet
  • 8 steps
  • Level : Beginner
Run a full service on the till : Clocking in: name, personal code, till

Who is it for?

  • Hôte / caisse / comptoir
  • Serveur / chef de rang
  • Responsable de salle
  • Barman
  • Patron / gérant

Roles with access

  • Gérant·e
  • Serveur·se
  • Barman·maid
  • Hôte·sse / Caissier·ère
  • Boutique (réseau)
  • Franchisé·e (réseau)
  • Directeur·rice d'établissement
  • Responsable commercial · view

The owner always has access. See what each role sees →

Recommended hardware

Tablet

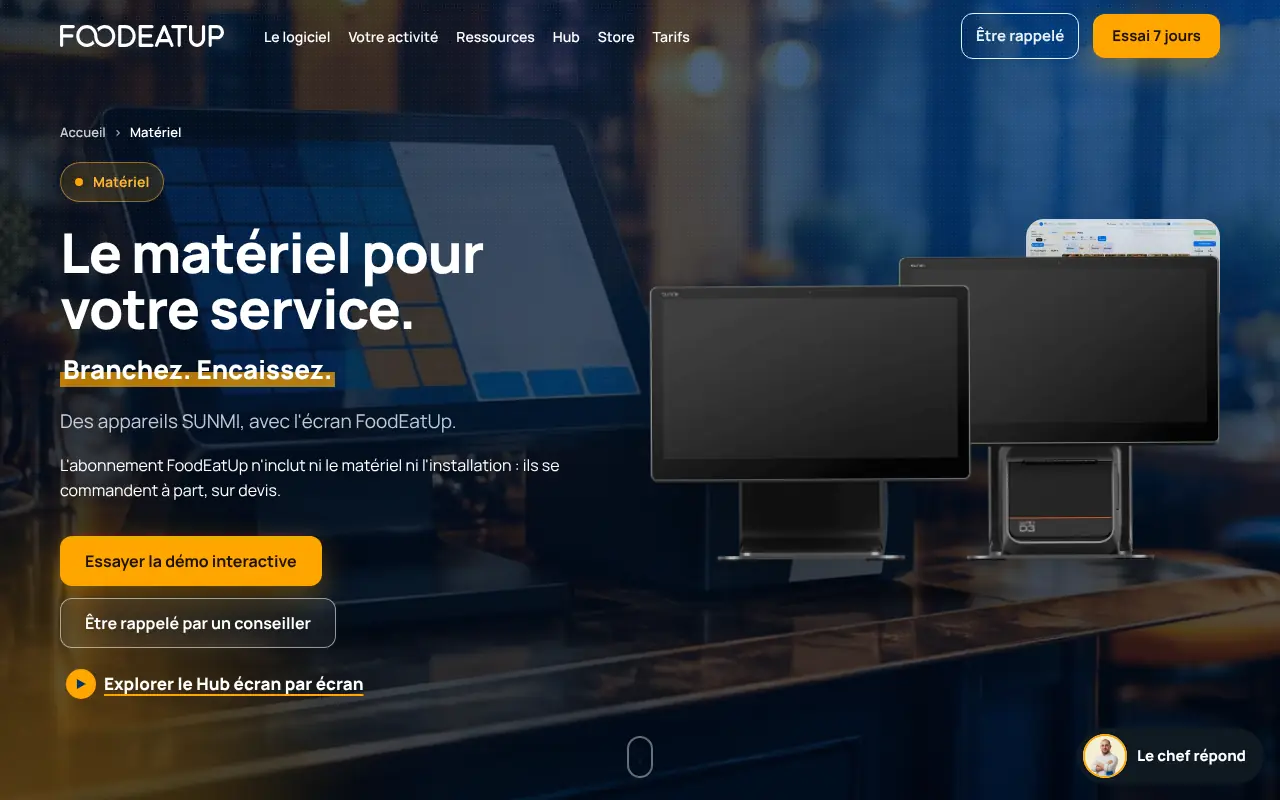
A tablet or a SUNMI till at the counter, a receipt printer, and if you wish a Smile&Pay card terminal and a tablet in the kitchen. The same till opens on a computer and, smaller, on a phone.

See the hardware →

What it is for

  • Take an order at a table, at the counter, to take away or for delivery, and send it to the kitchen in one tap.
  • Take cash, card, meal vouchers, cheque, gift card, customer tab, or split the bill between guests.
  • Receive kiosk, website, table QR and phone orders in the same place.
  • Close the day with a Z report per till and a combined Z, with no adding up by hand.

Why set it up

  • The till is where everything starts: each sale updates the kitchen, stock (if enabled), loyalty and figures.
  • Every action that touches money carries the name of the person holding the till: their personal code is what counts.
  • Safeguards (maximum discount, meal voucher cap, blind closing) are set once and apply to the whole team.

The same screen, on every device

The real software screens, as they appear on each device.

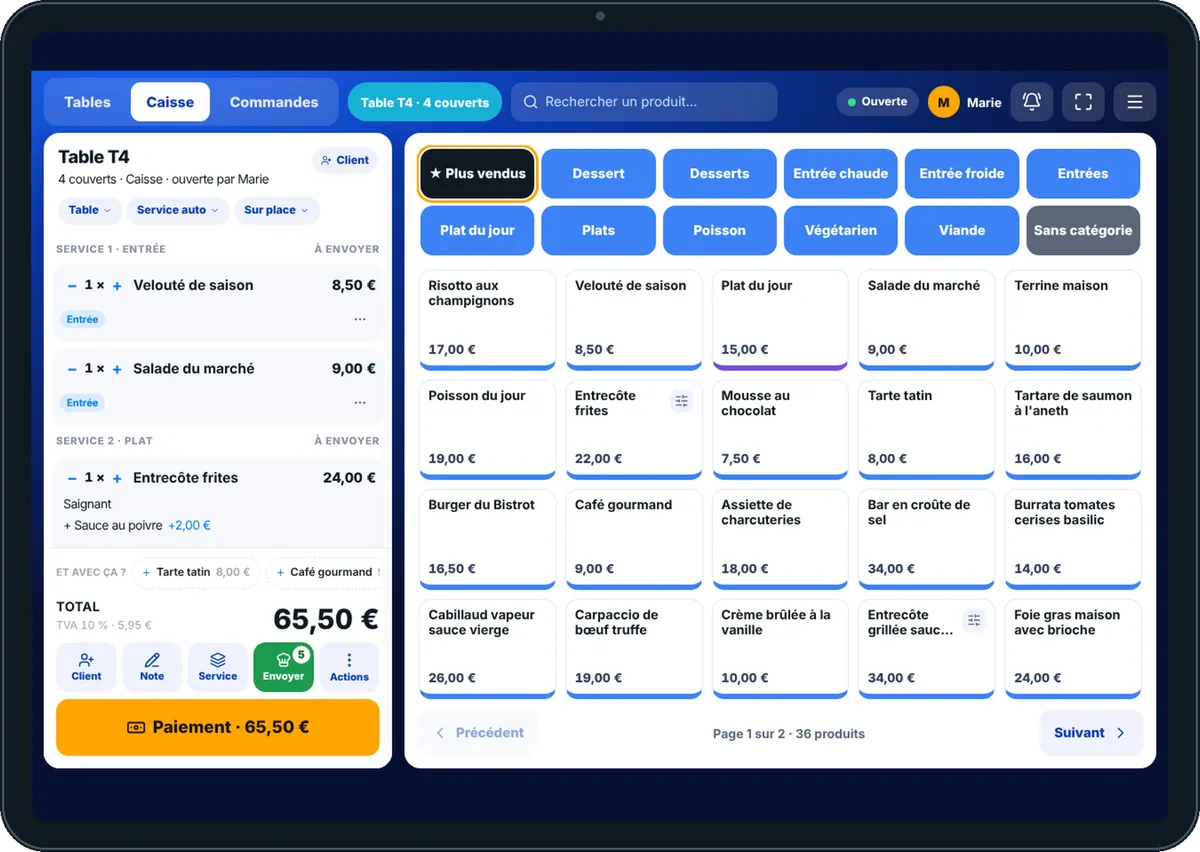
Till — On the tablet
On the tablet
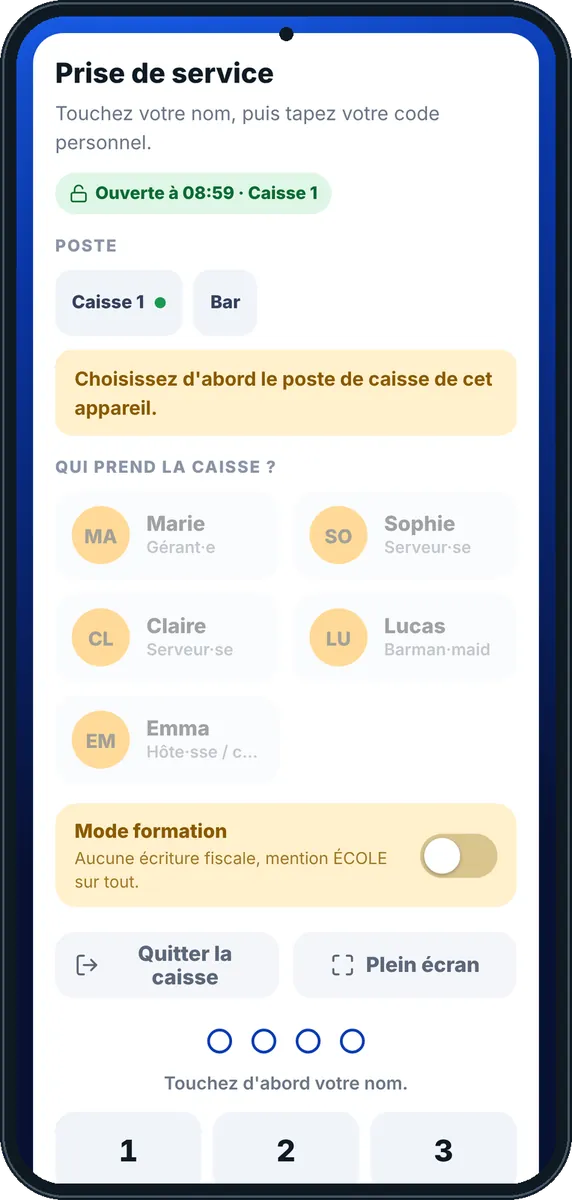
Till — On the phone
On the phone
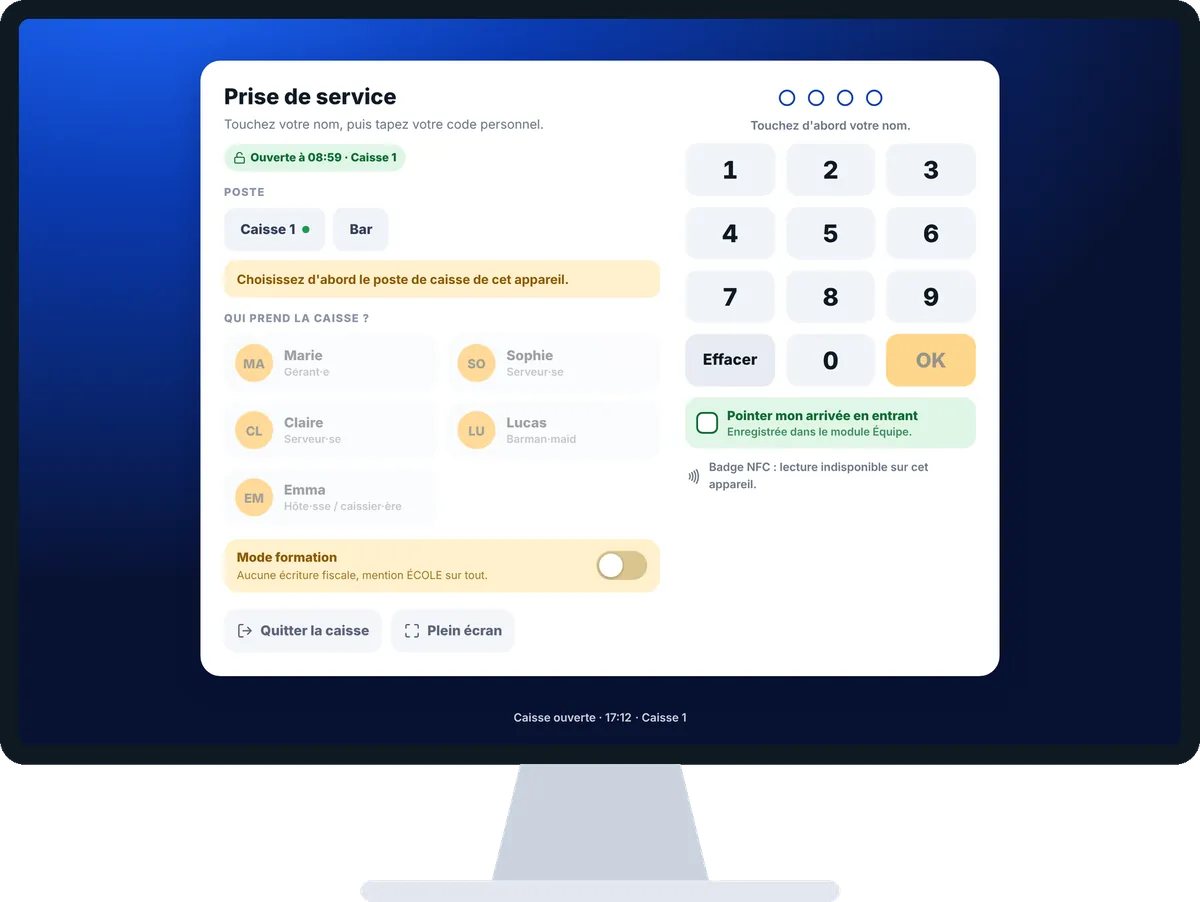
Till — On the computer
On the computer

Step by step

Run a full service on the till : 8 steps, with the real software screens.

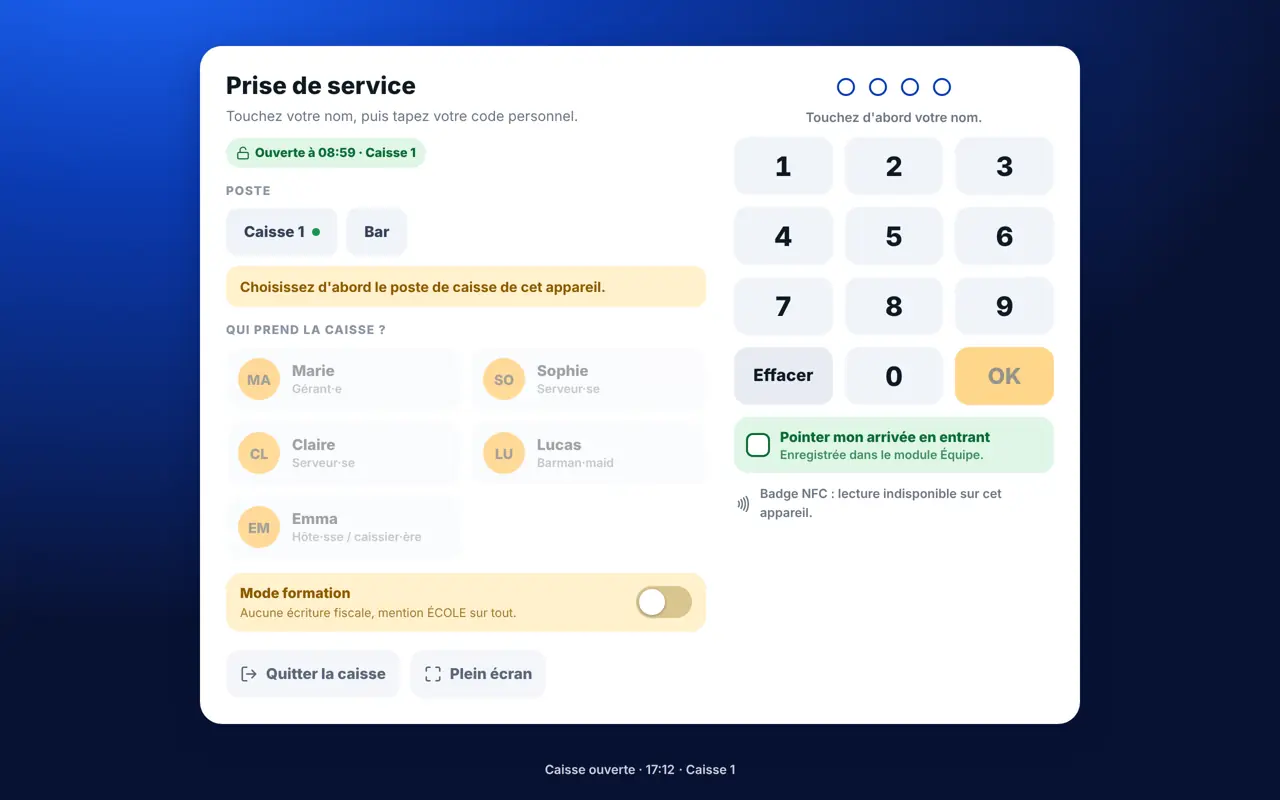
  1. 1Step 1

    Clock in on the till

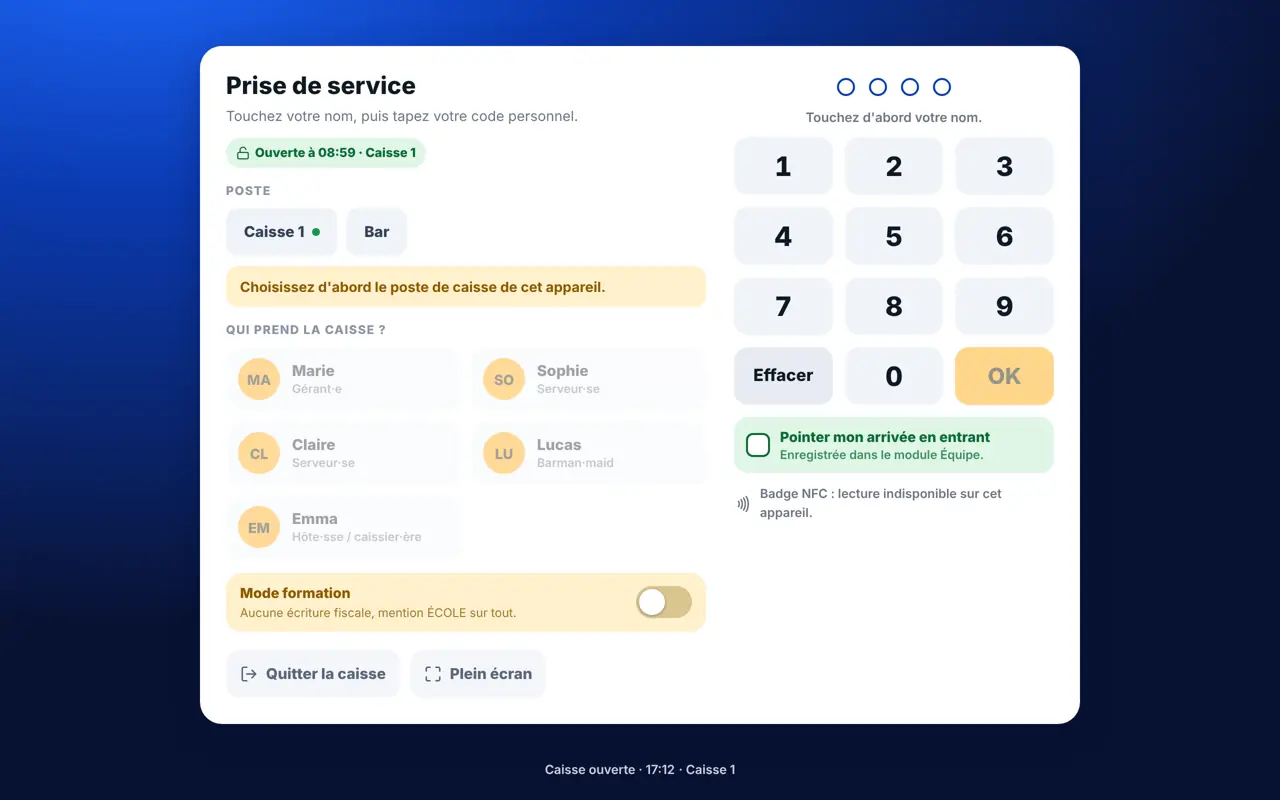
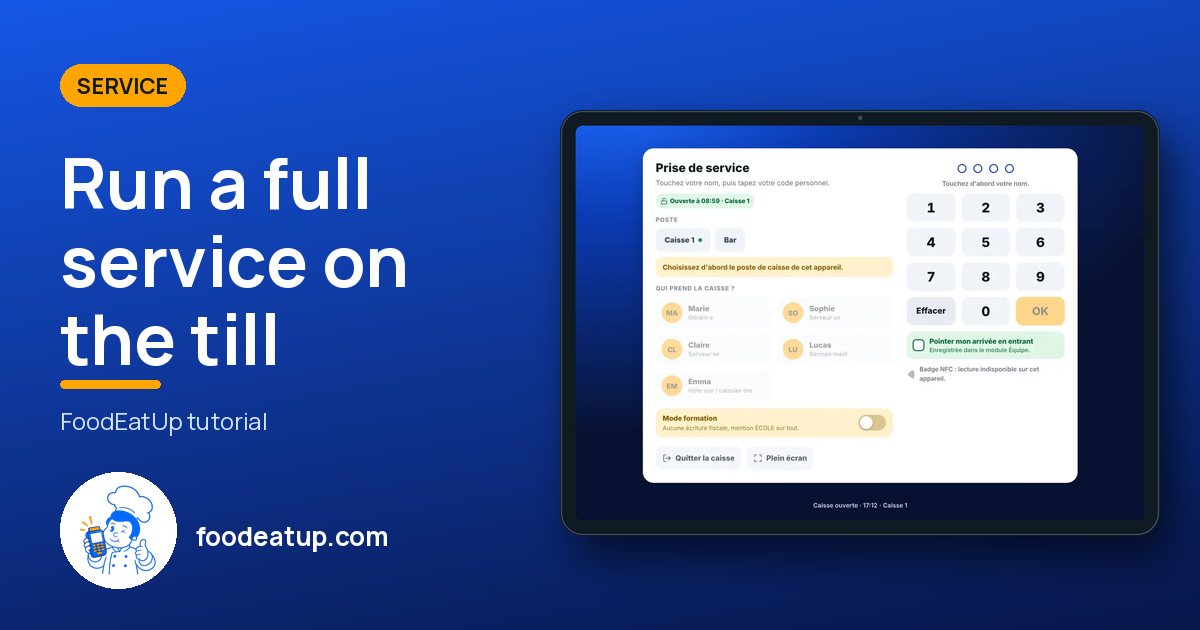
    Open Service › Caisse. Tap your name and type your personal code: it validates on the last digit. Pick the till if there are several (Bar, Dining room…). Tick “Pointer mon arrivée en entrant” to clock in at the same time.

    Clocking in: name, personal code, till
  2. 2Step 2

    Open the till

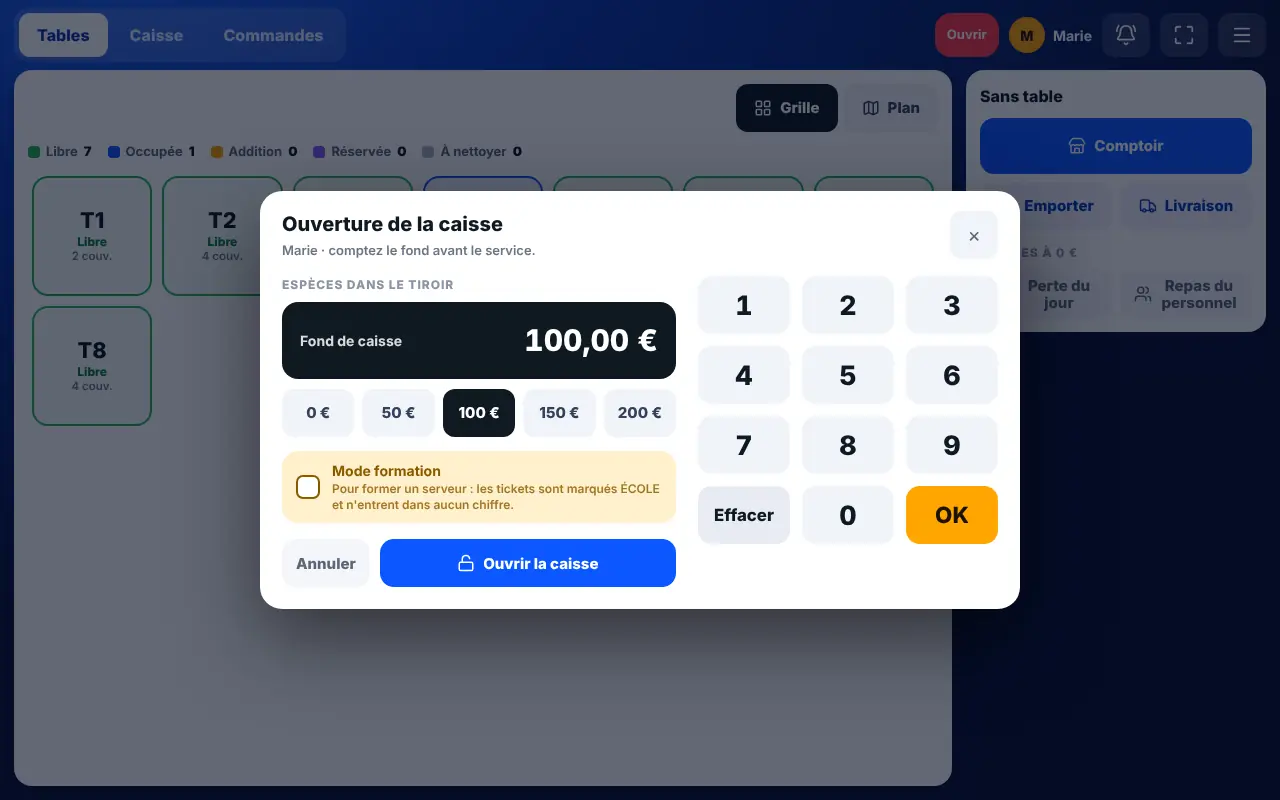
    If the till is closed, type the float (the cash in the drawer) and tap “Ouvrir la caisse”. To train a new server, choose “Ouvrir en mode formation”: nothing counts in turnover.

    Opening the till and the float
  3. 3Step 3

    Pick a table and its covers

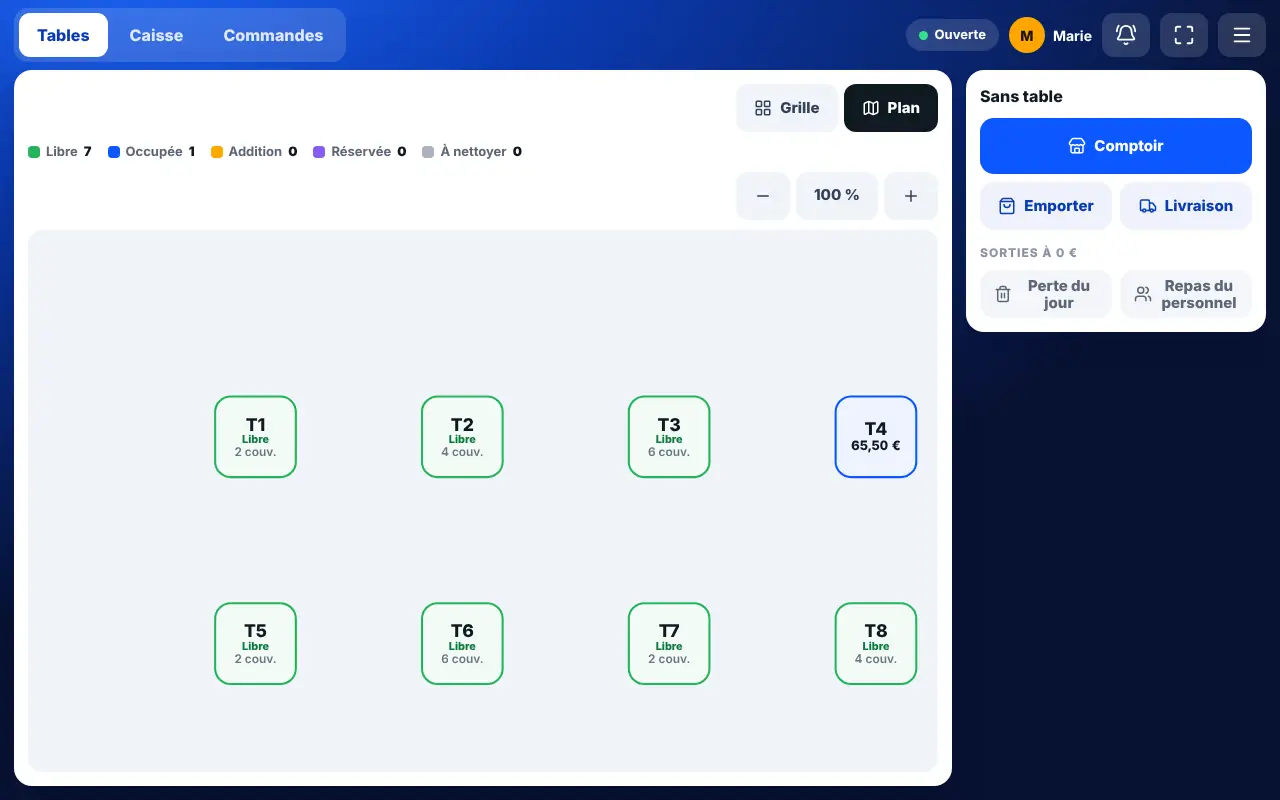
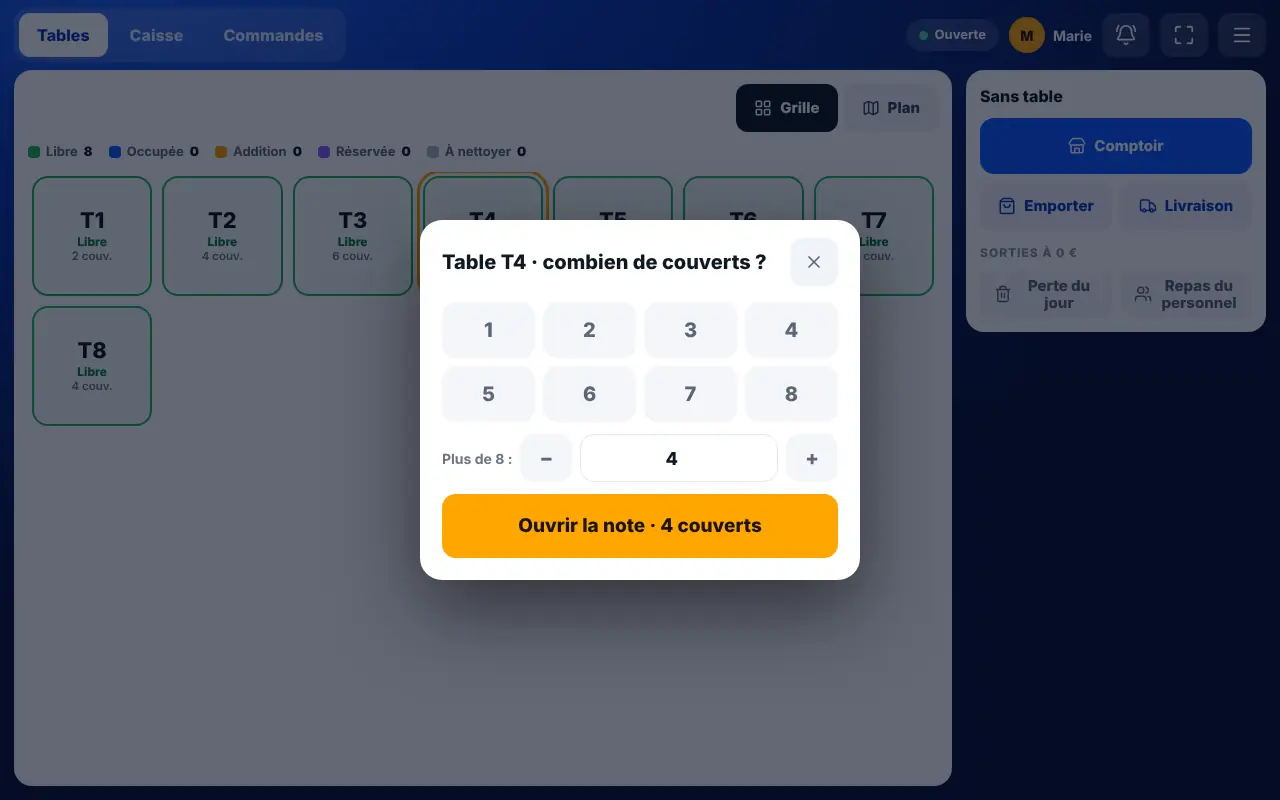
    In the “Tables” tab, tap a free table, then the number of covers. For a sale without a table, tap “Comptoir”, “À emporter” or “Livraison” in the “Sans table” column.

    The till floor plan
  4. 4Step 4

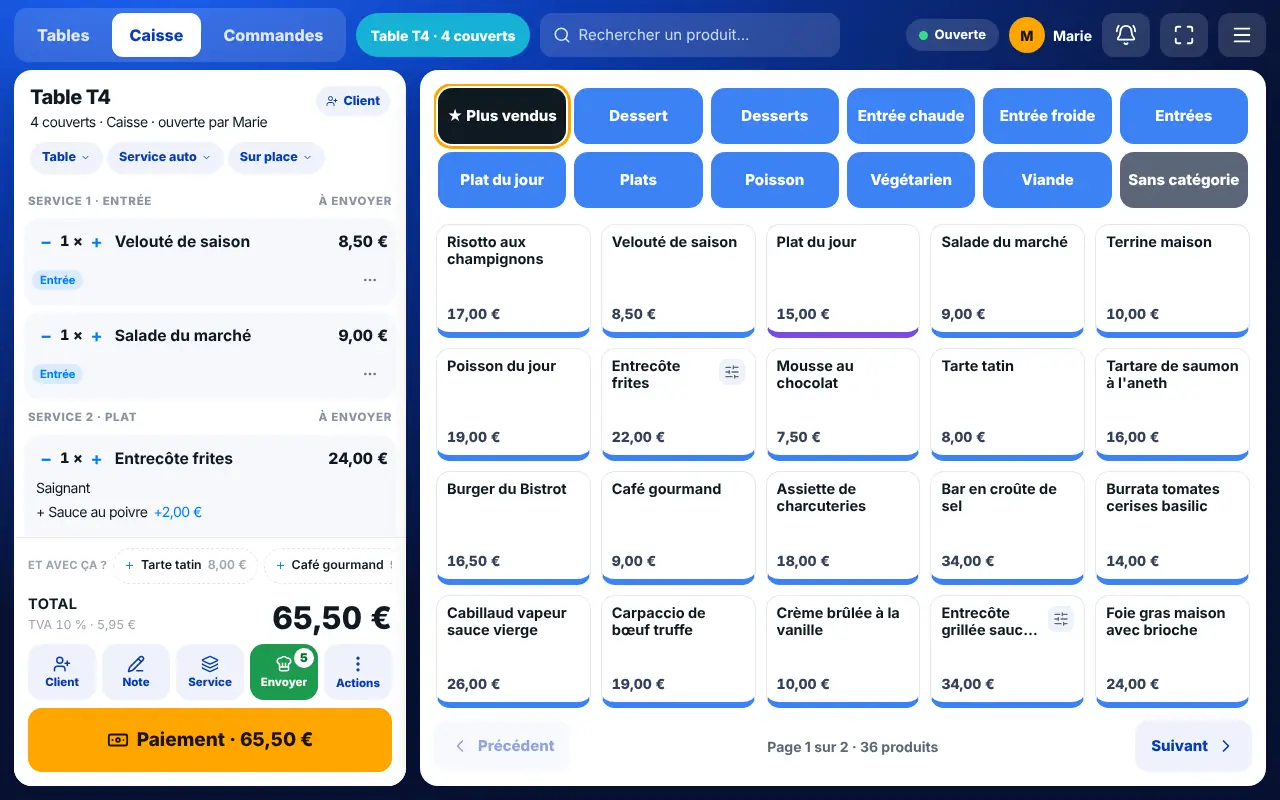
    Take the order

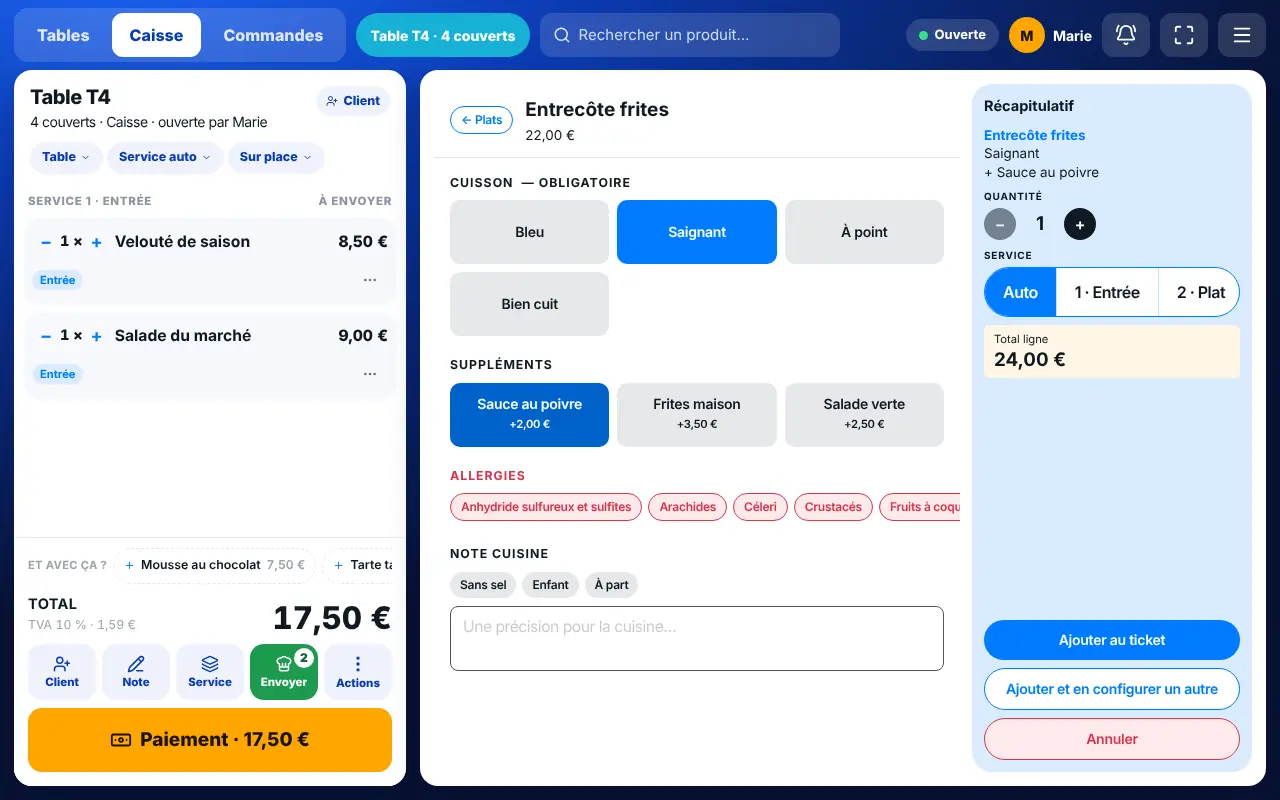
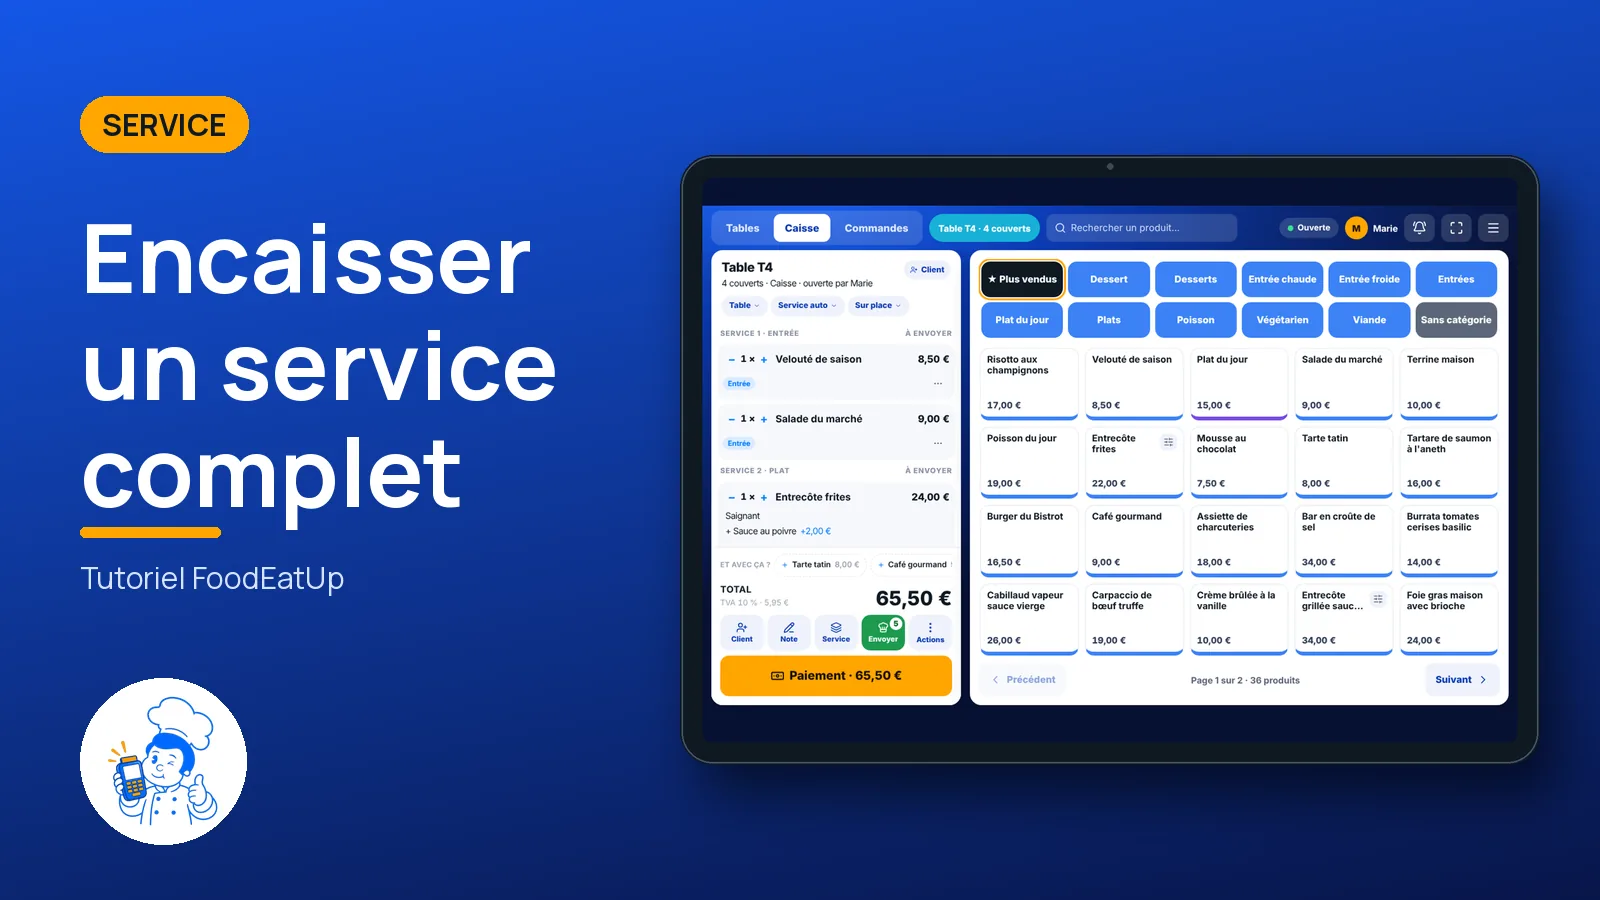
    Tap a category, then a dish: it is added to the ticket. If the dish has a required option (cooking), the customisation panel opens. Pick the guest and the course before adding, if you work by courses.

    The menu and dish customisation
  5. 5Step 5

    Send to the kitchen

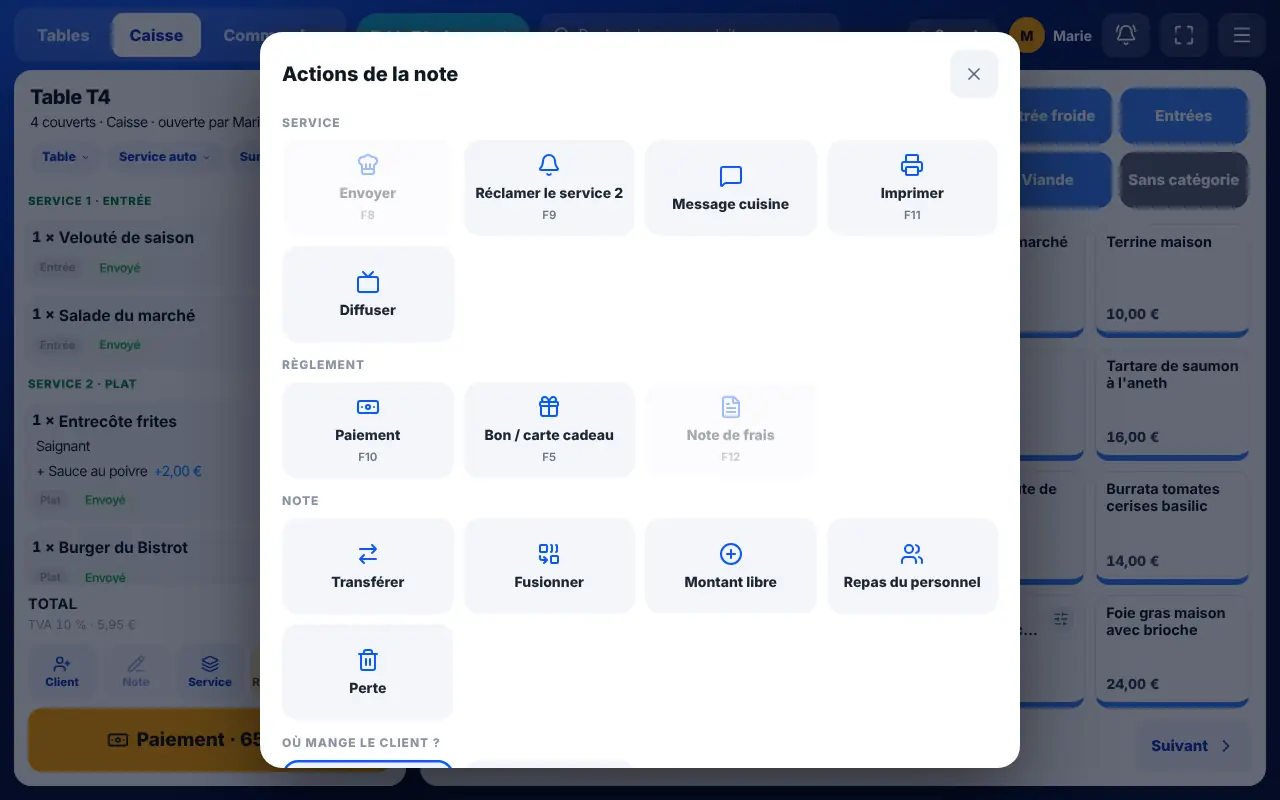
    Tap “Envoyer” (or F8). The lines go to the kitchen screens and station printers; a sent line is locked. When ready, “Réclamer” (F9) fires the next course.

    Order actions: send, fire, payment
  6. 6Step 6

    Take payment

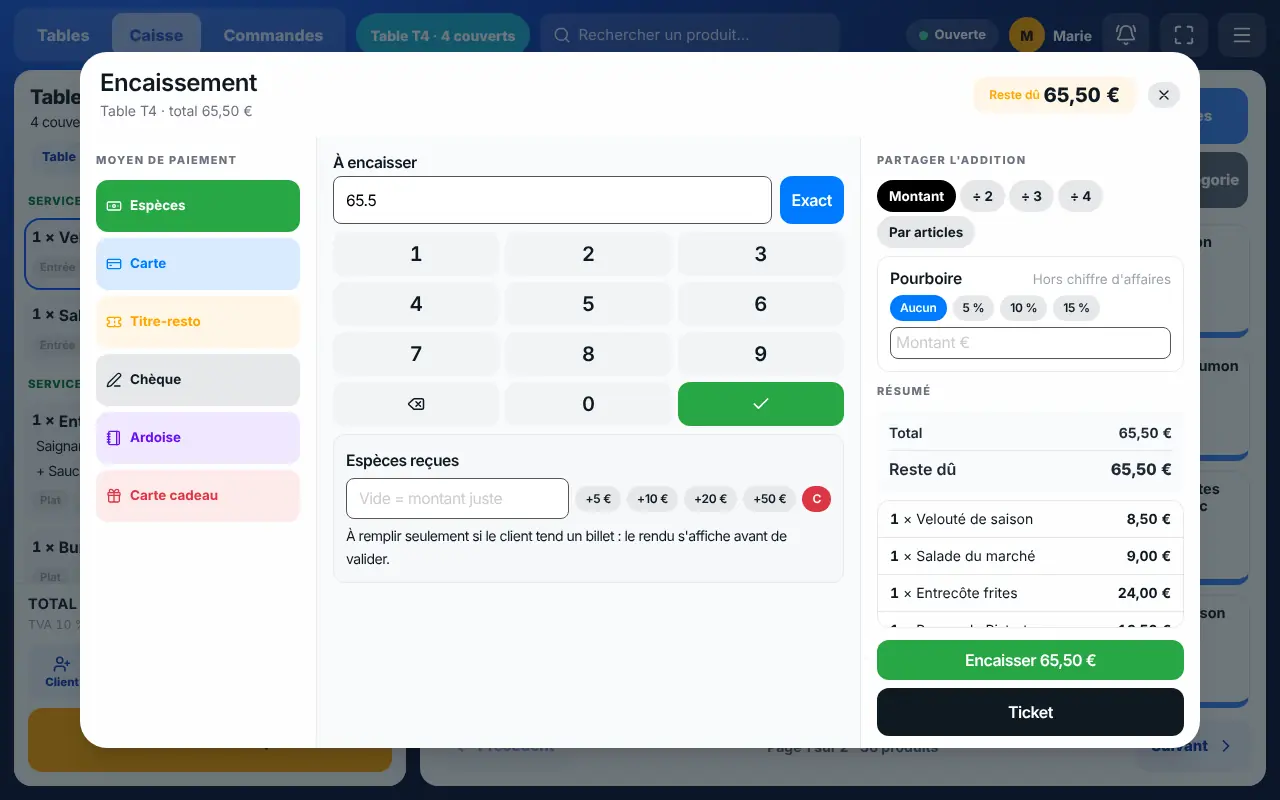
    Tap “Paiement” (F10). Choose the method, type the amount on the keypad or tap “Exact”, add a tip if needed, then “Encaisser”. A settled order ends with “Terminer”.

    The payment window
  7. 7Step 7

    Follow incoming orders

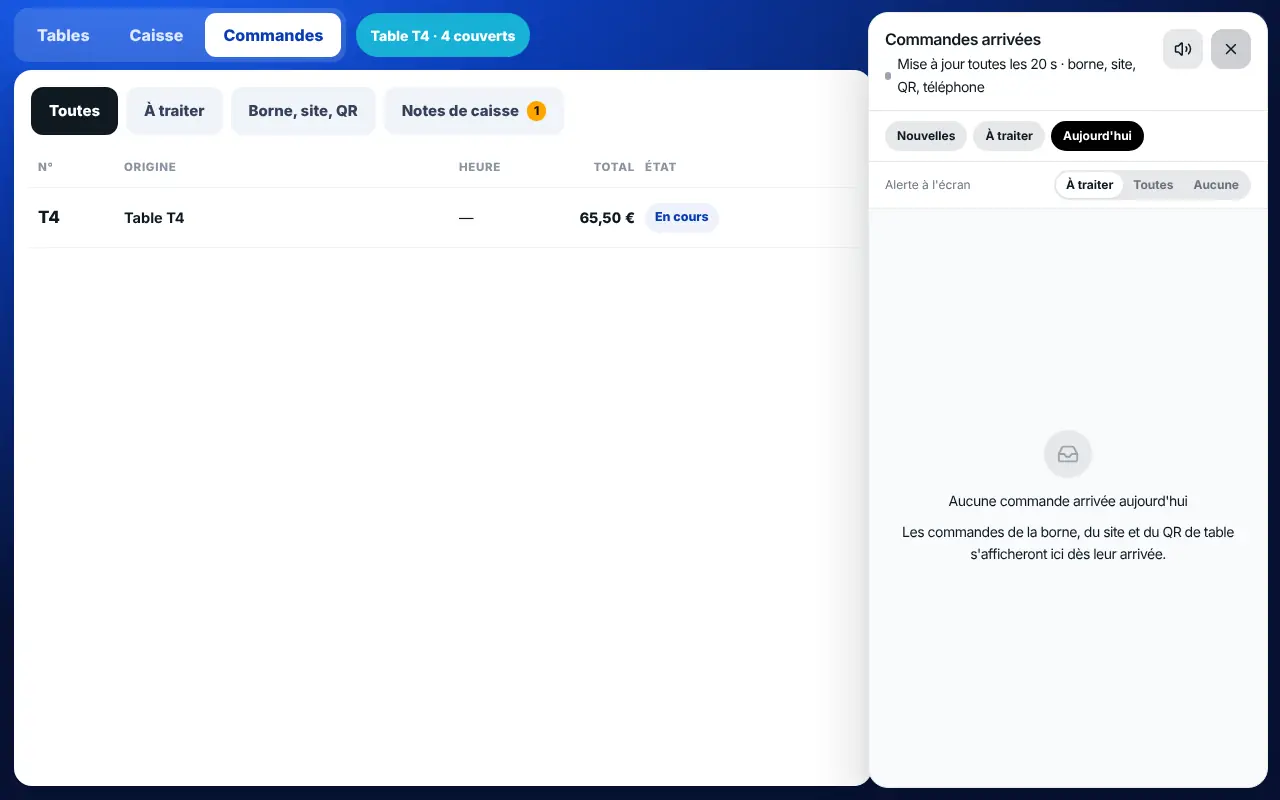
    The “Commandes” tab and the bell show what comes from the kiosk, website, QR and phone. An order “À encaisser” is paid without reopening the order.

    Incoming orders in the till
  8. 8Step 8

    Close the day

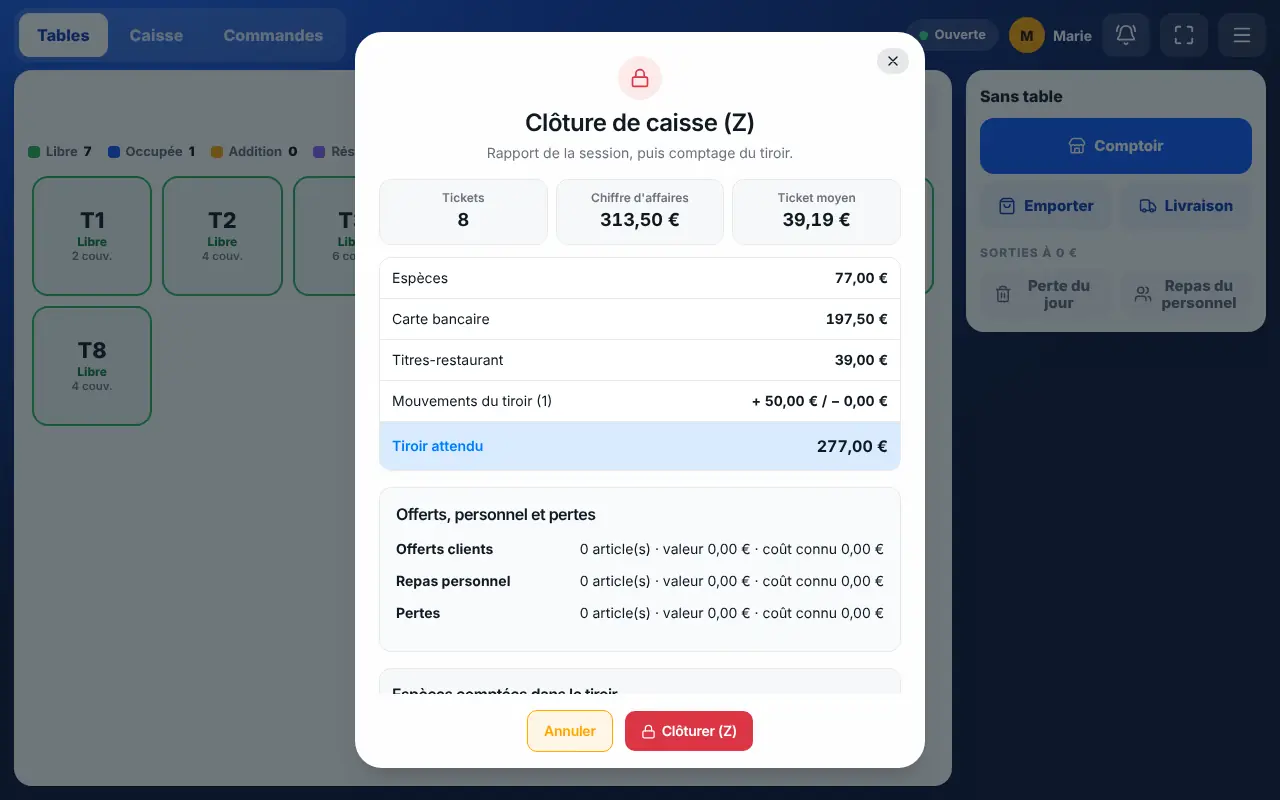
    At the end of service, open the “Caisse” menu › “Clôturer (Z)”. Count the drawer and confirm: the till’s Z is saved. “Z consolidé du jour” adds up all tills.

    Z closing and drawer count

Every screen, every button

Each screen in detail: what every button is for and what it triggers.

Clocking in

The first screen: who takes the till, on which station. It also shows straight away whether the till is open or closed.
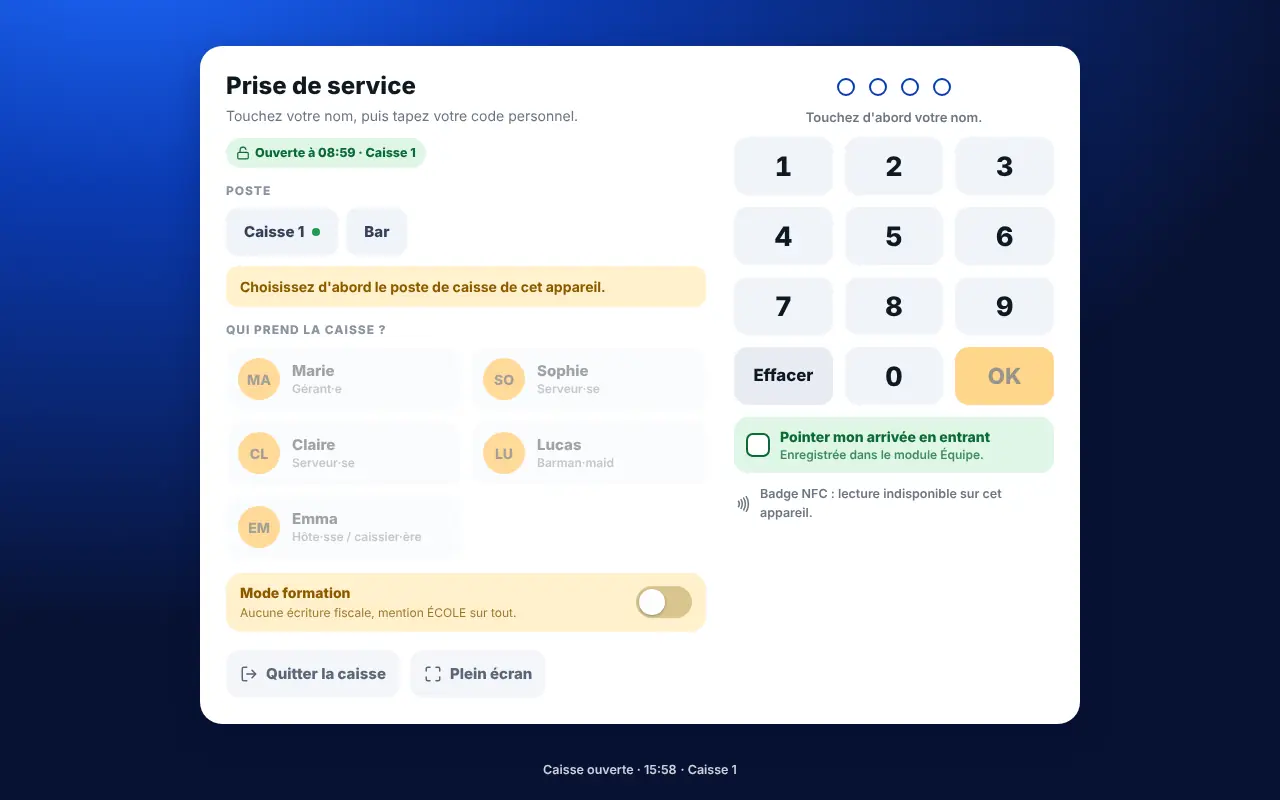
Till — Clocking in
Your name
Tap your name in the “Qui prend la caisse ?” list. Only employees allowed to manage the till appear.
Personal code
Type your code on the keypad: the same code as the time clock. It validates on the last digit. After several wrong codes, the till makes you wait.
Till
Shown only when there are several tills (Bar, Dining room, Terrace). The choice is kept on the device.
Till status
Shows “Caisse ouverte” (with time and person) or “Caisse fermée” even before your code.
Pointer mon arrivée en entrant
Tick box: your arrival is recorded in the Team module at the same time.
Mode formation
Prepares a training till: tickets are marked “ÉCOLE” and count in no figure.
Full screen
Switches the till to full screen on the tablet.
Badge
On an Android device that reads contactless badges, a badge can replace tapping your name.
Opening the till

A till opens with a float: the cash in the drawer at the start of service. It is the basis of the evening count.

Till — Opening the till
Fond de caisse
Type the cash you put in the drawer. It is used to compute the expected amount in the evening.
Ouvrir la caisse
Opens the till session. Sales, payments and cash movements are attached to it until the Z.
Ouvrir en mode formation
Opens a training session: no ticket counts in turnover, the Z or statistics.
Caisse fermée · ouvrir
In the top bar: reopens the opening window if you came in without opening the till.

With several tills, each has its float, drawer and Z: the evening cash difference always has an owner.

The top bar

It always shows who holds the till, on which station, whether it is open, and where you are.

Till — The top bar
Tables
The till floor plan: tables, orders without a table, orders to pay.
Caisse
Goes back to the open order, or opens an order without a table.
Commandes
Today’s orders coming from elsewhere (kiosk, website, QR, phone). The badge counts what needs action.
Rechercher un produit
Search a dish by name or code (F3).
Bell
Incoming orders, with an on-screen alert and a sound you can mute.
N à encaisser
Orange button: orders whose customer chose to pay at the counter. F6 opens it too.
Open orders
The number of open orders; one tap opens the list.
Who holds the till
The operator’s initial and name, start time; the float shows on hover.
Mode école
Orange badge while the till is in training.
Caisse
The till menu button: every other function (next chapter).

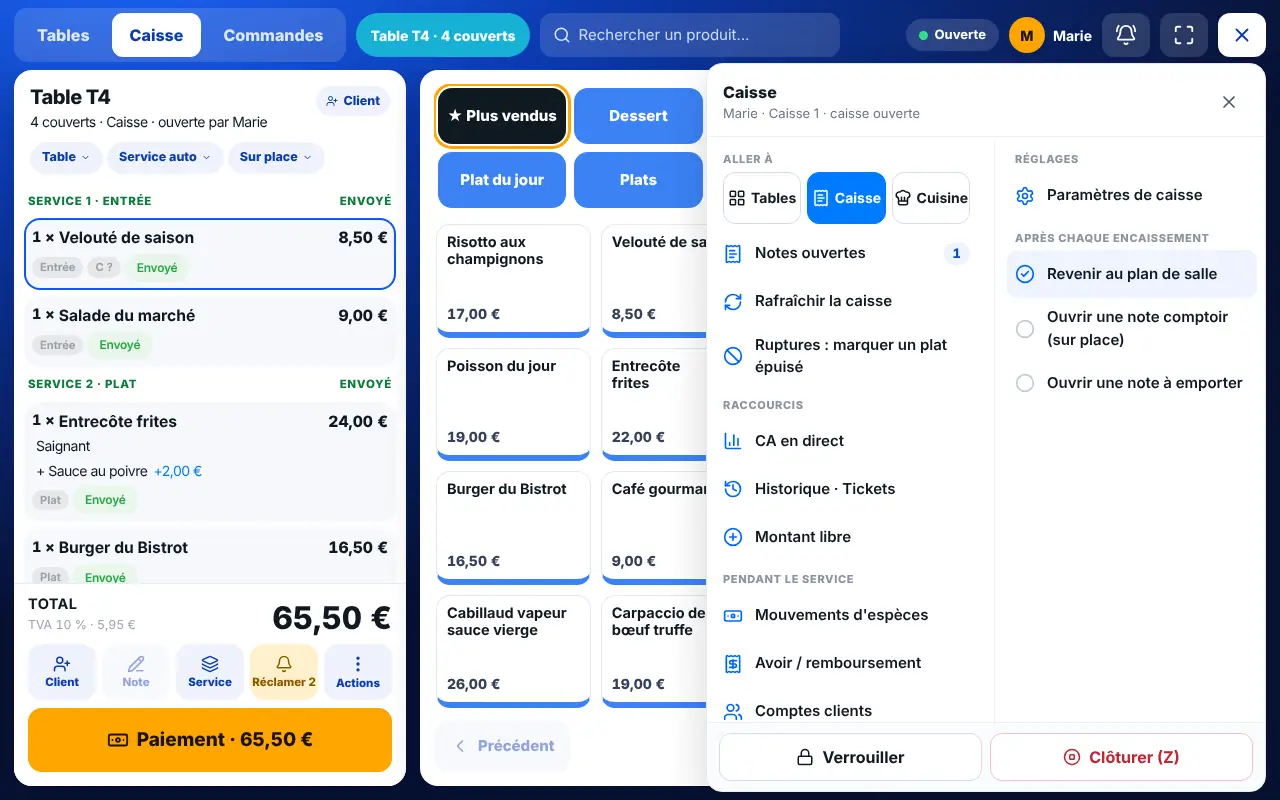
The “Caisse” menu

Everything not needed for each sale is here. A function marked “caisse fermée” needs the till to be open first.

Till — The “Caisse” menu
Aller à › Tables, Caisse, Cuisine
Changes view. “Cuisine” shows the kitchen view inside the till; “Écran cuisine · nouvel onglet” opens the first prep station’s screen in another tab.
À encaisser au comptoir
The queue of kiosk or tablet orders to pay at the counter.
Notes ouvertes
All open orders, every till, including those to check after an unanswered terminal payment.
Rafraîchir la caisse
Reloads the menu and settings.
Ruptures
Sold-out mode: one tap marks a dish sold out for the day, everywhere (till, kiosk, QR, website). A second tap puts it back.
Mouvements d’espèces
Cash in or out of the drawer, with a required reason: each movement explains the evening difference.
Avoir / remboursement
Refunds all or part of a settled order, with a reason. Visible on the Z, the owner is notified.
Comptes clients
Customer tabs: orders paid later, with a limit, and taking a payment on them.
Happy hours
Automatic discounts by time slot, applied by the till.
Mon service
Your service summary: tickets, discounts.
Z consolidé du jour
The total for the day, all tills.
CA en direct, Historique · Tickets
Shortcuts: current turnover and tickets already paid.
Montant libre
On an order, for a manager: a line with a typed amount, no stock.
Affichage
Blue or White colours, full screen, “Quitter la caisse”.
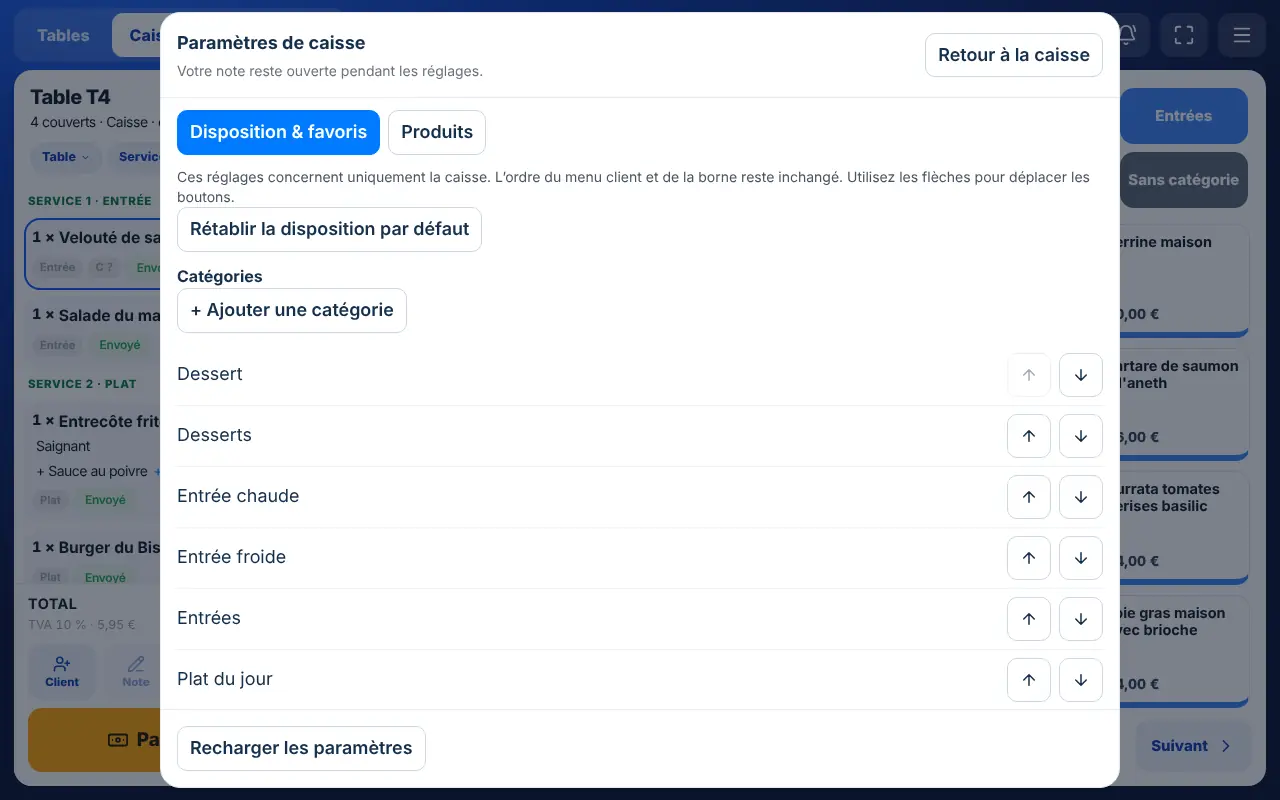
Paramètres de caisse
Till layout: order of categories and products, favourites, hidden products, quick product creation.
Après chaque encaissement
Back to the floor plan, open a counter order, or open a takeaway order after each sale.
Verrouiller
Back to clock-in: the next server types their code. Orders stay open.
Clôturer (Z)
Closes the till session and produces its Z.

The till floor plan

Each table states its status in words and, when occupied, the amount due: what a server reads from three metres away.

Till — The till floor plan
Zones
Tabs by zone, with the number of open tables. Shown only from two zones.
Grille | Plan
Tables as a grid, or in place in the room if they were placed in the floor plan. Kept on the device.
− / + of the plan
Zoom on the floor plan.
Free table
Opens the covers window, then the order.
Occupied table
Reopens the order. The tile shows the amount due, time at table, “rien envoyé” if nothing went to the kitchen, and bill requested.
Libérer
On a table “À nettoyer”: frees it once cleared.
Sans table › Comptoir, À emporter, Livraison
Opens an order without a table. Counter = eaten in (eat-in rate); takeaway and delivery use the takeaway rate.
Notes en cours
Open orders without a table; one tap reopens them.
À encaisser
Kiosk orders to pay: “Encaisser” opens payment directly.
Sorties à 0 € › Repas du personnel, Perte du jour
Opens a dedicated order: items leave at €0 with a beneficiary or a cause. Not a sale.

Covers

Before opening a table, the till asks how many people sit down.

Till — Covers
1 to 8
One tap picks the number of covers and opens the order.
Plus de 8
The keypad with − and + for a large group.
Annuler
Back to tables, nothing opened.

Covers feed the statistics (average spend per cover, room occupancy): get used to entering them right.

The order

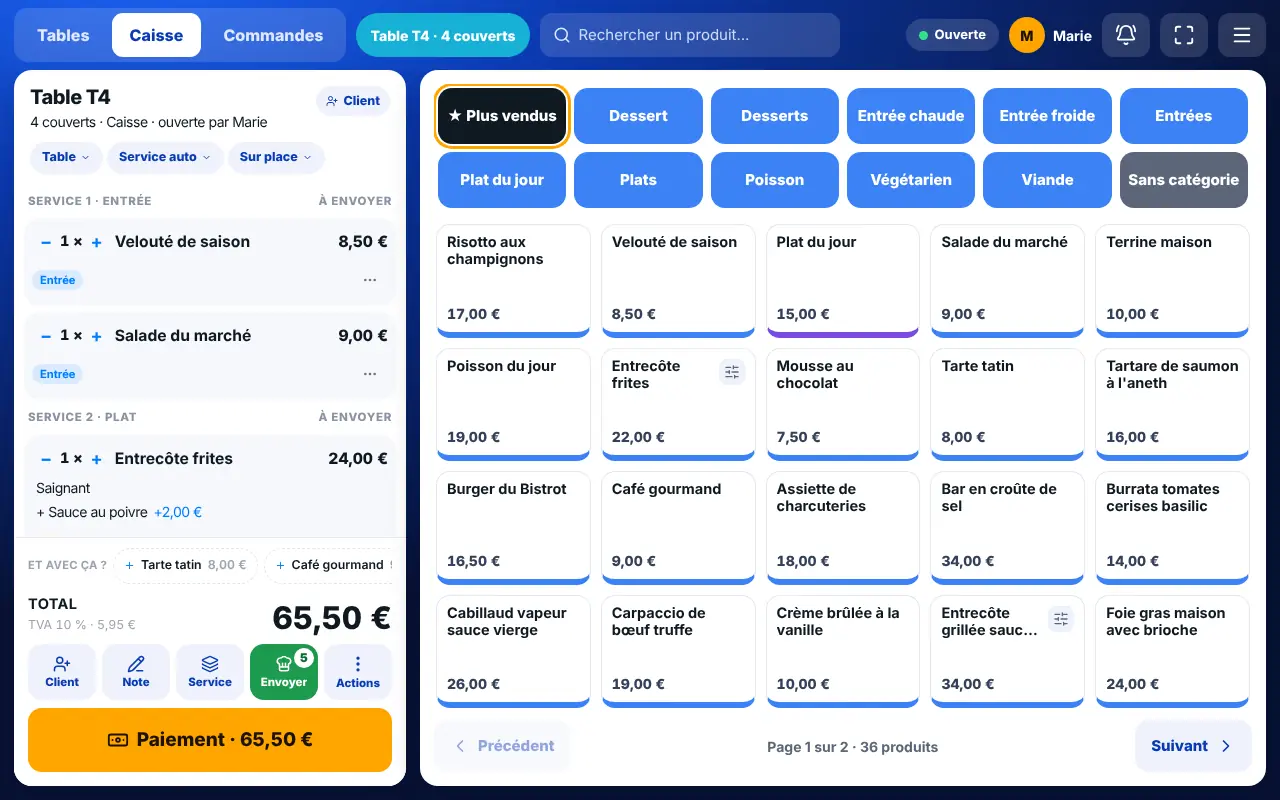
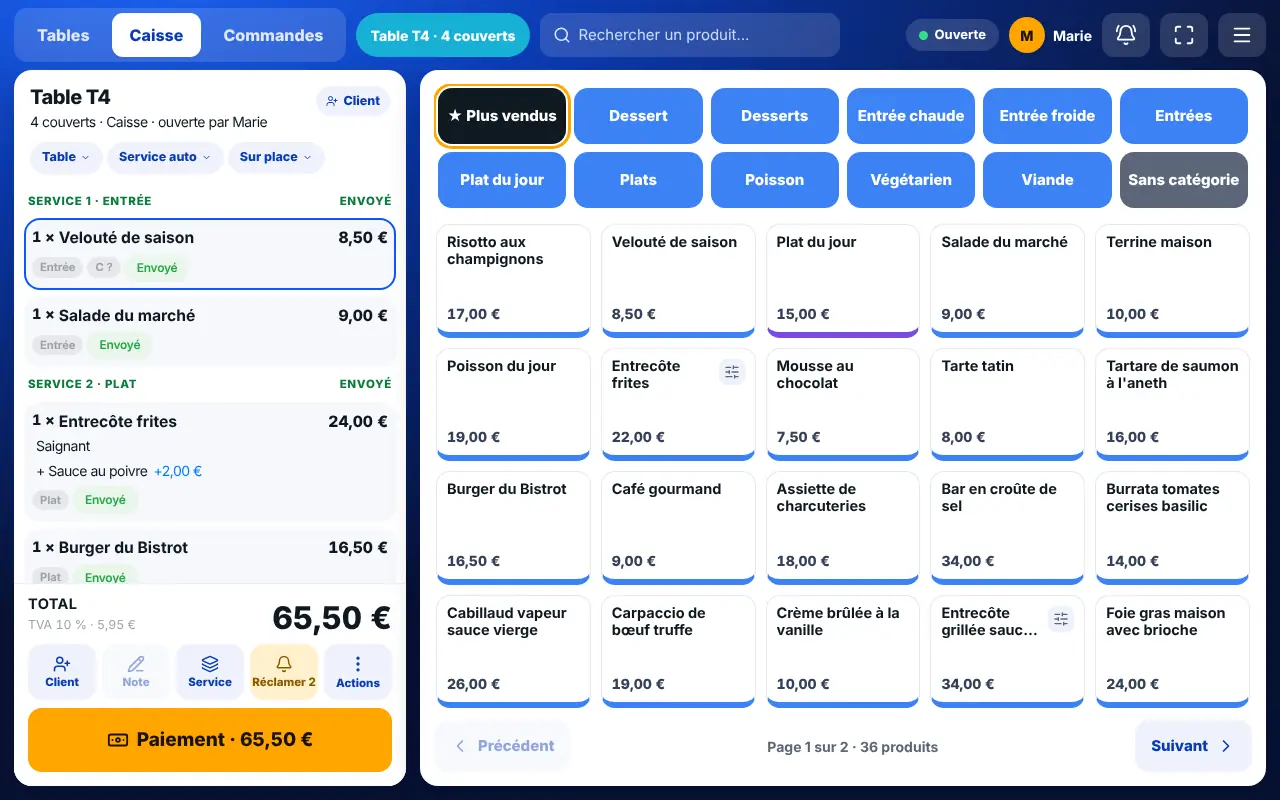
Ticket on the left, menu in the middle. The ticket reads top to bottom: customer, guest, course, lines, total.

Till — The order
Client
Attaches a customer (name, phone). This is what credits loyalty points at payment.
Table / Convive
The guest for the next items (C1, C2…), used to split the bill by guest.
Service
“Service auto”: the dish category decides (starter, main, dessert); otherwise you force the course.
Sur place / À emporter
The order mode, which sets the VAT rate of all its lines.
+ / −
Changes the quantity of a line not yet sent.
Line name
Reopens customisation of a line not yet sent.
Et avec ça ?
Suggestions (drinks, desserts…) the customer does not have yet. One tap adds them.
Envoyer
Sends lines to the kitchen (F8).
Actions
Opens the window with all order actions.
Paiement / Terminer
The big button: opens payment (F10). On a settled order it becomes “Terminer”; on an all-free order, “Clôturer à 0 €”.

Menu, set menus and customisation

Categories are coloured tiles. A dish is added with one tap; anything that needs a choice opens a panel.

Till — Menu, set menus and customisation
★ Plus vendus
All dishes, best sellers of the last 30 days first. Without history the tile is called “Toute la carte”.
Category
Opens its dishes, and those of its subcategories with “Tous” chips.
Formules
Builds a set menu step by step. A set menu that cannot be sold at the till is greyed with its reason.
Dish tile
Adds the dish. A required option opens the panel; long press or the options button to customise anyway.
Customisation panel
Choices, paid extras, removals, allergies (closed list), kitchen note, quantity and course.
Épuisé
A sold-out dish is greyed. Tapping it offers to put it back on sale.
Reste N
For a dish tracked in portions: what is left. When the counter runs out, only the till can “sell anyway”.
Précédent / Suivant
Moves between product pages.
Table chips
At the top of the menu: switch between open tables without the floor plan.

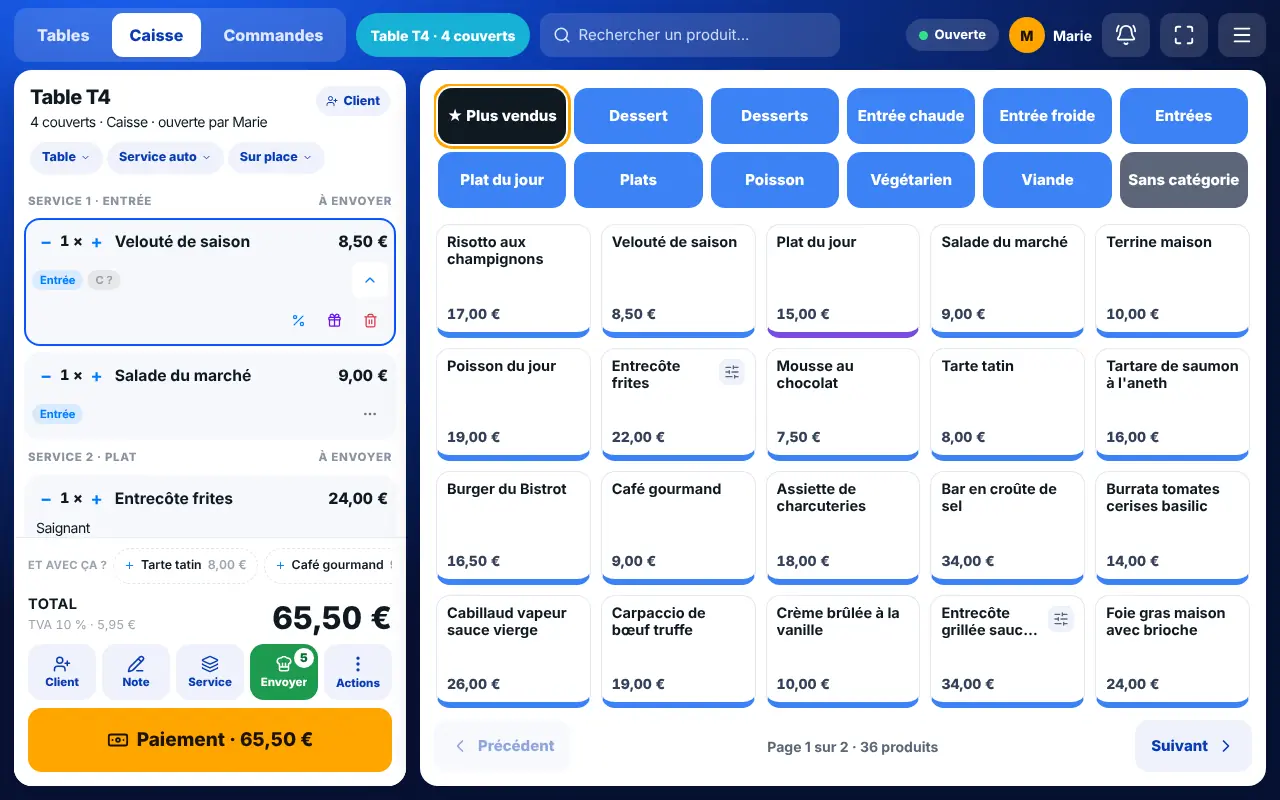
Line menu, guest and course

Each line has a “⋯” button. A line already sent to the kitchen is locked: it can no longer be deleted or its quantity changed.

Till — Line menu, guest and course
Remise
A percentage on the line. Above the set maximum discount, a manager is needed (their code counts).
Offert
The line goes to €0, with a reason. Needs the right to manage the till.
Changer le prix
Only if the setting allowing a manager to change a line price is on: reason required, marked on the ticket and counted on the Z. The dish VAT does not change.
Supprimer
Removes a line not yet sent.
C1, C2 chip
Changes the guest of a line.
Course chip
Changes the course of a line before sending.
Set menu
Quantity, removal, discount and free item apply to the whole menu at once.

After a first payment, the order can no longer go below the money already taken: a paid line can no longer be removed.

The order “Actions” window

The “Actions” button of the ticket opens every action, grouped in service order: Service, Payment, Order, Where the customer eats, Exit.

Till — The order “Actions” window
Envoyer (F8)
Sends lines to the kitchen, each to the station that prepares it.
Réclamer (F9)
Fires the next course: the kitchen sees “Réclamé”. Shown only when there is a course to fire.
Message cuisine
After sending: a message of up to 140 characters (or a shortcut) shown on the relevant stations’ screens.
En attente
Puts an order without a table aside. It is still due and counts for closing.
Imprimer (F11)
Prints the bill on the “Ticket client” printer.
Diffuser
Pushes a poster to the dining-room screens (Screens offer, right to broadcast). Shown only if a screen is connected.
Paiement (F10)
Opens the payment window.
Bon / carte cadeau (F5)
One field: a “FID-…” code is a loyalty voucher, any other is a gift card.
Clôturer à 0 €
Closes an all-free order.
Note de frais (F12)
Issues an expense note without the dish detail, for a business customer. Only on a settled order.
Envoyer le ticket
By e-mail, or by text if the restaurant’s texting is set up. Only on a settled order.
Transférer
Moves the order to a free table.
Fusionner
Merges two orders. Refused if the source order has already received a payment.
Montant libre
A line with a typed amount, for a manager.
Repas du personnel, Perte
Sets the chosen items to €0 with a beneficiary or a cause.
Sur place · 10 % / À emporter · 5,5 %
Changes the order mode and recomputes VAT on every line.
Annuler la note
In red, apart: reason required, unsent items are dropped. Final.

The payment window

Three columns on a desktop: payment methods, keypad, then split, tip and summary. One column on a phone.

Till — The payment window
Espèces
Type the cash received: the till shows the change.
Carte
A card paid on a terminal that is not connected: you record the amount by hand.
Carte (TPE)
Shown if a Smile&Pay terminal is connected: “Envoyer au TPE” shows the amount on the terminal, the customer presents the card, the till gets the answer.
Titre-resto
No change given. A cap per ticket can be set in the safeguards.
Chèque
Records a cheque payment.
Ardoise
Puts the amount on a customer tab, created first in “Comptes clients”.
Carte cadeau
Type or scan the code: the amount comes off the balance, the rest stays on the card.
Keypad and “Exact”
Amounts are typed in cents (3270 = €32.70). “Exact” enters the amount due in one tap.
Pourboire
Cash, card or cheque only. It is not turnover nor VAT; it is counted separately on the Z.
Partager l’addition
÷ 2, ÷ 3, ÷ 4, “Par articles”, or “Répartir par convive” (what each guest owes, to the cent).
Lien de paiement
The customer pays the remainder on their phone. Offered only if Smile&Pay web payment is set up; the order is settled only when the money arrives.
Encaisser
Records the payment. When nothing is due, the order is settled and the receipt can print.
Annuler ce paiement
Asks for confirmation. A card payment taken by the terminal is not cancelled here: it is refunded.

If the terminal does not answer, never ask the customer to pay twice: check whether an “ACCEPTÉ” slip came out, then “Vérifier l’encaissement”. As a last resort, a manager picks “Le client paie autrement” in the open orders.

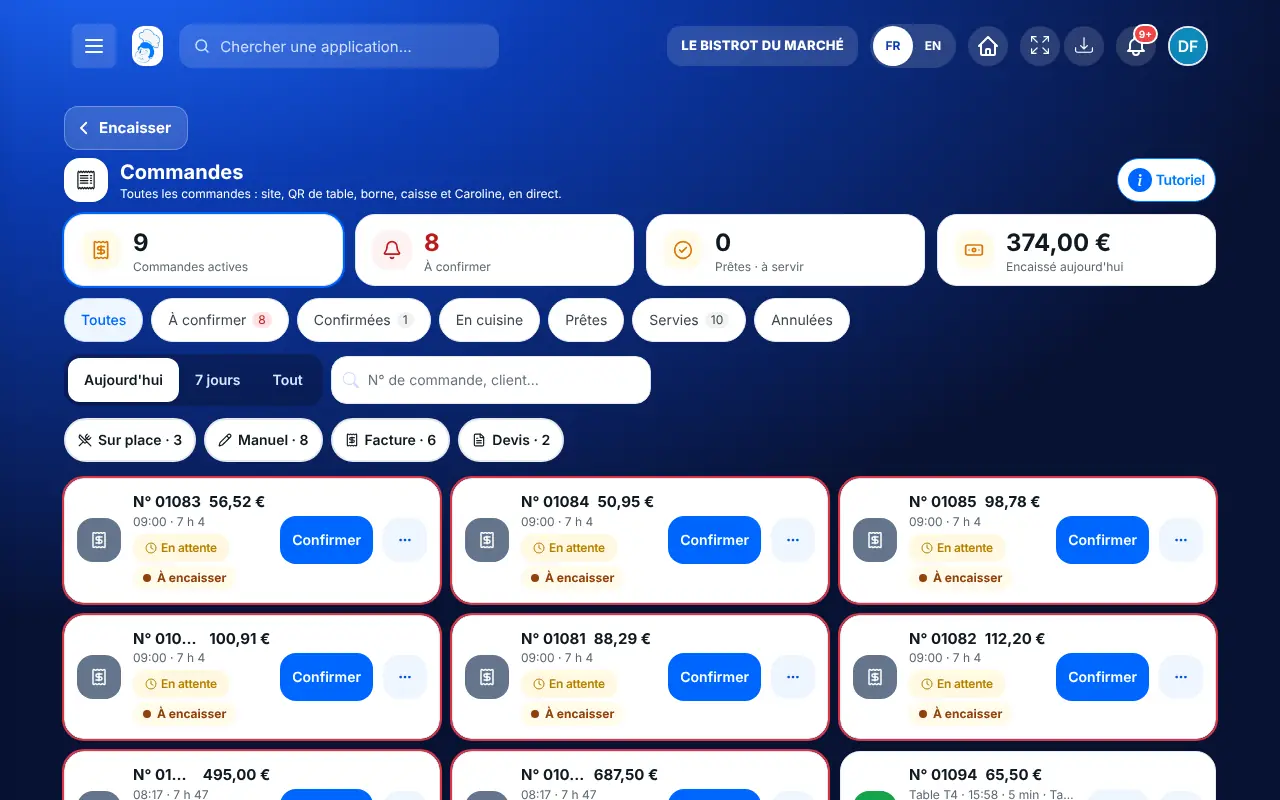
Orders and the bell

Orders not created at the till land here: kiosk, website, table QR, phone.

Till — Orders and the bell
Filters
“À traiter”, “Toutes”, and by origin: only orders needing action are counted in the badge.
À valider
A table QR order the dining room must approve before it goes to the kitchen.
À encaisser
The customer chose to pay at the counter: “Encaisser” opens payment without leaving your screen.
Déjà payée
Order paid online: nothing to take.
Statuses
Received, In the kitchen, Ready, Done, Cancelled: the real status of each order.
Bell
The panel of incoming orders, updated live (and every 20 seconds as a fallback).
Alerte à l’écran
Per device: “À traiter” (default), “Toutes” or “Aucune”. The badge and list always show everything.
Sound
Turns the new-order chime on or off.

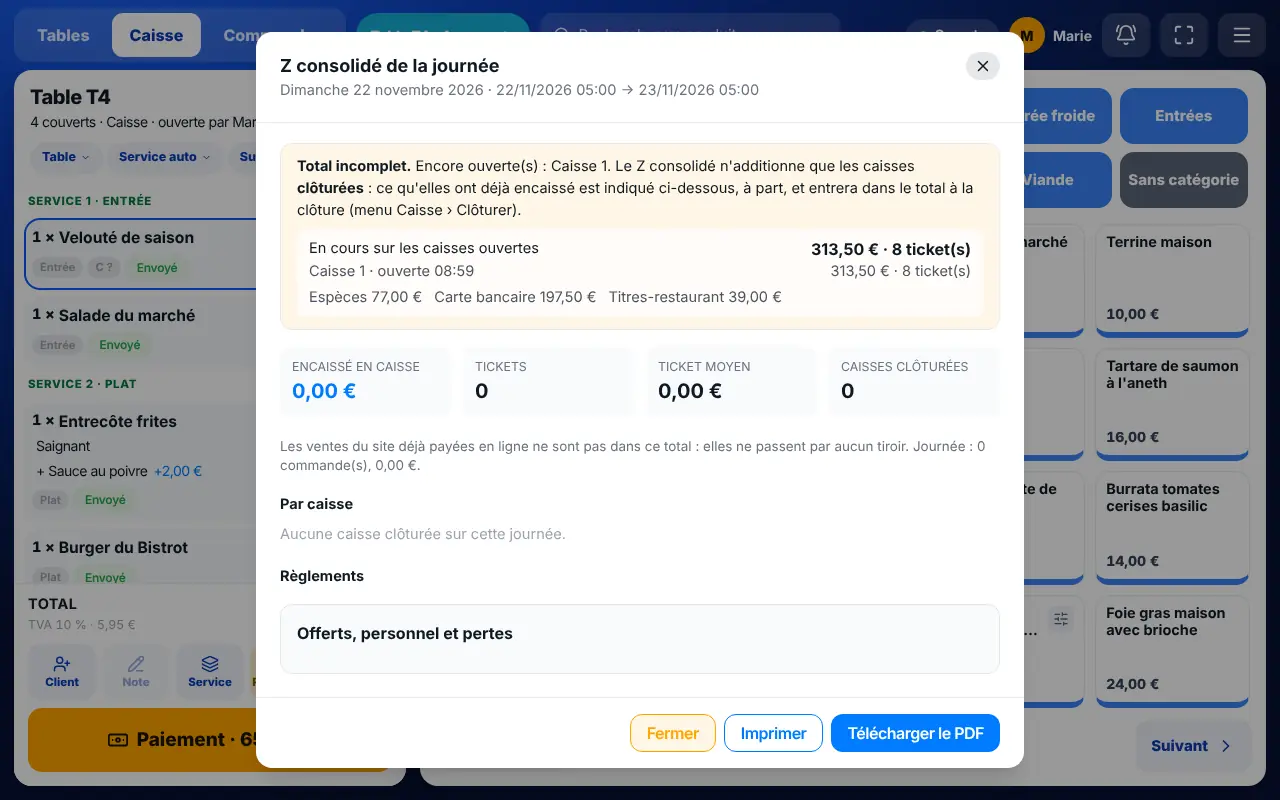
Combined Z, “Mon service” and figures

During or after service, these screens read the till without changing anything.

Till — Combined Z, “Mon service” and figures
Z consolidé du jour
The day’s total, all tills: tickets, average ticket, VAT, payments, difference per till with who closed. An open till shows “Total incomplet”.
Previous days
Chips for days already closed.
Télécharger le PDF
The combined Z for the accountant.
Imprimer
The combined Z strip on the reports printer.
Mon service
Your summary: tickets and discounts.
CA en direct
Current turnover.
Historique · Tickets
Orders already paid, to find or reprint a ticket.

The combined Z follows the service day (a service ending at 1 am belongs to the day before). Sales already paid online are named apart: that money went through no drawer.

Z closing

Closing a till means counting its drawer and freezing its report. Tills close at their own time: the bar can close before the dining room.

Till — Z closing
Session report
Turnover, tickets, average ticket, payments by method, cash movements.
Espèces comptées dans le tiroir
Type the counted total. The till shows the difference with the expected amount.
Compter par coupures
Enter the number of each note and coin: the total is computed and the detail printed on the Z.
Clôture aveugle
If enabled, the expected amount and difference stay hidden until the drawer is counted — except for a manager identified by their code.
Note (écart, incident…)
Explains a difference.
Orders still open
Closing the last till is refused while a dining-room order is open. An order whose terminal payment never completed can be set “à rapprocher” by a manager: nothing is deleted, nothing counted as paid.
Télécharger (CSV)
The session detail.
Tips
Total per server; with a common pot, a split is suggested (the software moves no money).

The tax compliance module (signed receipts, daily closings) is switched on with the FoodEatUp team. The till is not yet NF525 certified: ask before making it your main till.

Settings and safeguards

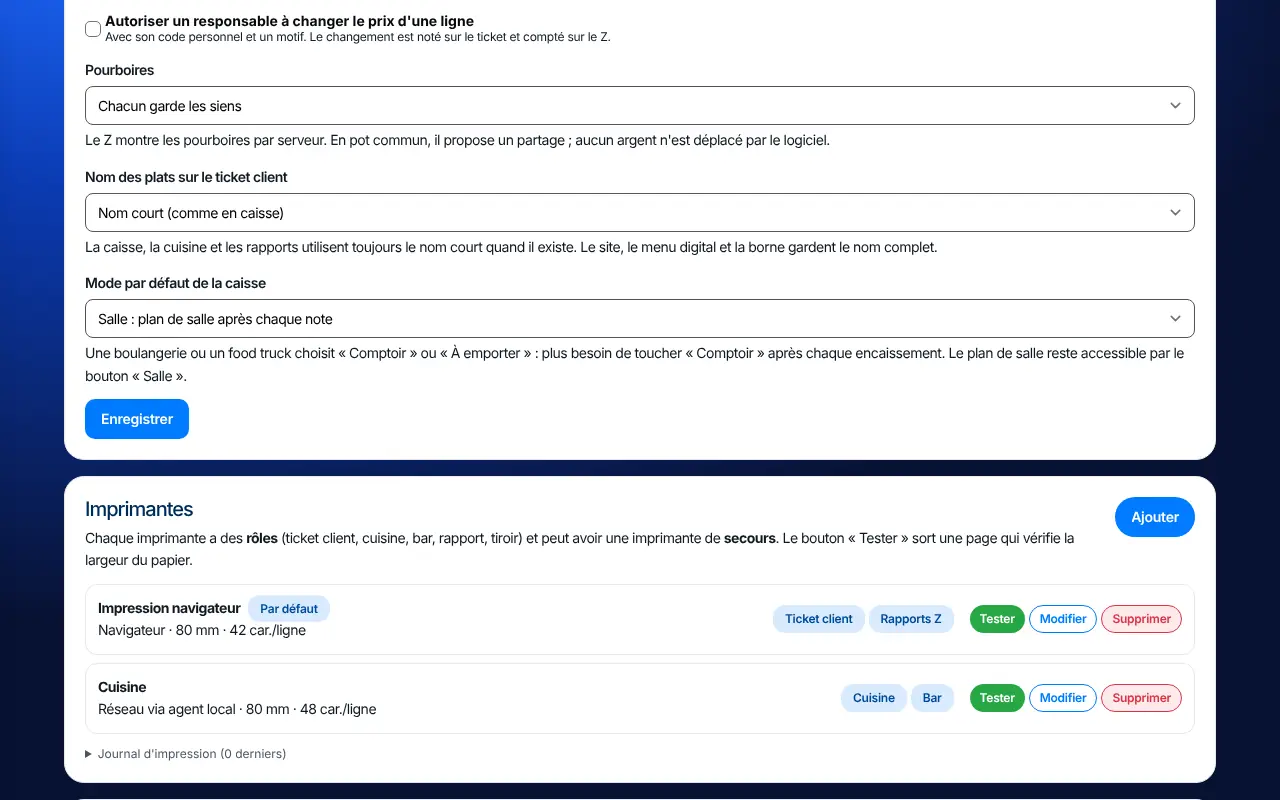
Two places: “Paramètres de caisse” (Caisse menu) for the layout, and Configuration › Intégrations › “Messages et TPE” for safeguards.

Till — Settings and safeguards
Disposition & favoris
Order of categories and products on the till. The customer menu and kiosk order do not change.
Favori
Favourites appear on the menu home, in the chosen order. Without favourites, the till shows best sellers.
Masquer sur la caisse
Hides a product on the till without removing it from the customer menu.
Add a product, a category
Creates a product (name, price incl. VAT, VAT type, category, channels) without leaving the till.
Remise maximale d’un serveur (%)
Above it, and for any free item, a manager is needed.
Plafond titres-restaurant par ticket
The maximum amount in meal vouchers per ticket.
Print the receipt automatically
The receipt prints at each payment.
“Table cleared” confirmation
After payment, the table goes “À nettoyer” instead of “Libre”.
Deduct ingredients at each payment
Ingredient stock moves with each sale.
Blind closing, changed price, tips
The three settings explained in the line, payment and closing chapters.
Dish names on the receipt
Short name (as on the till) or full menu name.
Mode par défaut de la caisse
Dining room, counter or takeaway after each order: for a bakery, the whole till opens at the counter.

The till app on a smartphone

The same till in your pocket: take the order at the table, take payment, follow the kitchen. These are the real screens of the FoodEatUp Till app.

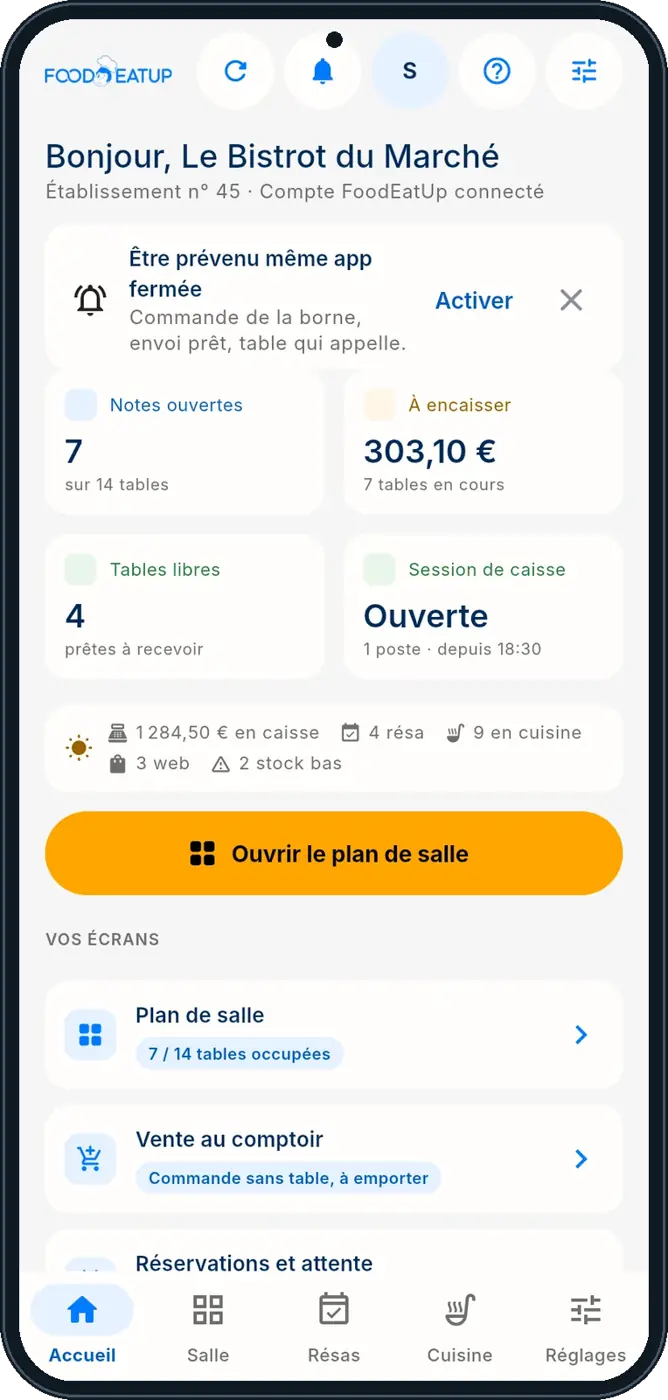
The app home screen

The FoodEatUp Till app opens on the service summary: open bills, amount to collect, free tables, till status. It signs in with the restaurant’s FoodEatUp account.

Till — The app home screen
Get notified even when the app is closed
Turns on phone notifications: kiosk order, kitchen course ready, table calling.
Open bills / To collect
What is in progress and what is left to collect, updated live.
Till session
Whether the till is open and since when. No open till, no payment.
Open the floor plan
The main gesture: go to the tables.
Counter sale
A bill without a table, takeaway or at the counter.
Bottom bar
Home, Floor, Bookings, Kitchen, Settings.

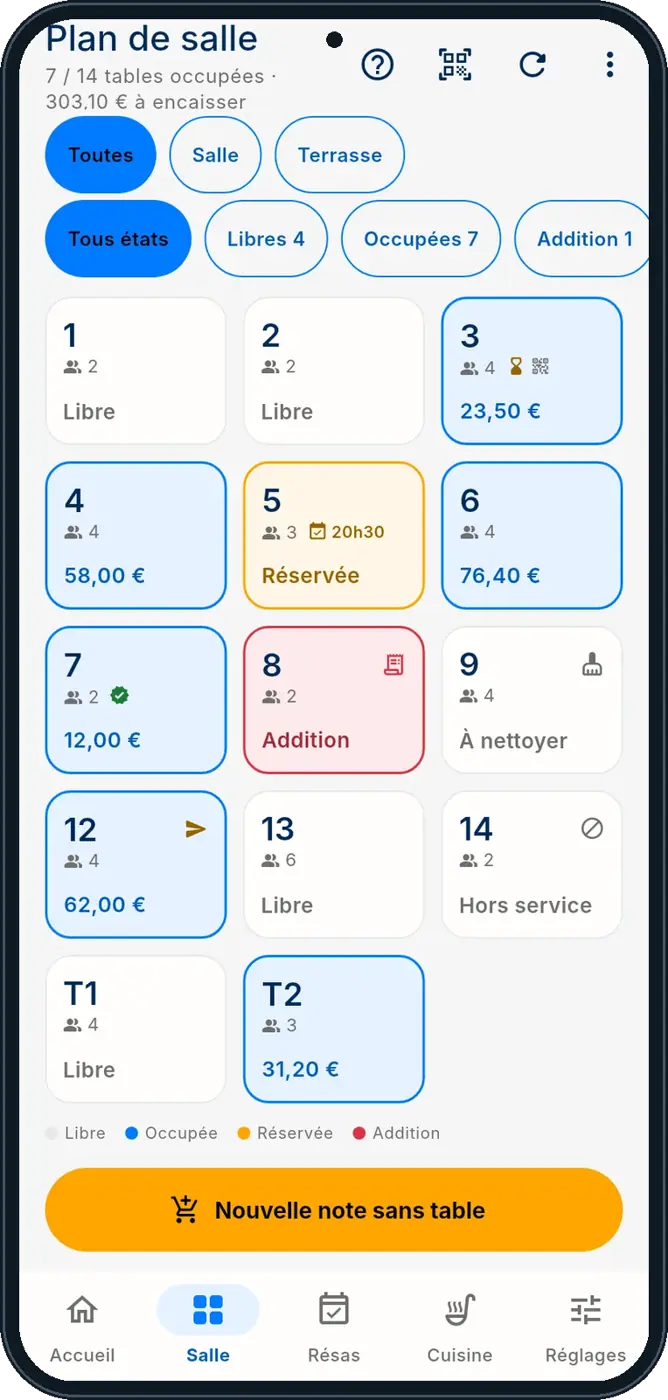
The floor plan

Every table with its state: free, occupied (with the amount), booked (with the time), bill requested, to clean, out of service.

Till — The floor plan
Zone filters
All, Dining room, Terrace: the zones of the floor plan.
State filters
Free, Occupied, Bill: find the right table in one tap.
Tap a table
Opens its bill (or opens one, asking for covers).
New bill without a table
A counter or takeaway sale.
QR icon
Scan a table’s QR code to open it directly.

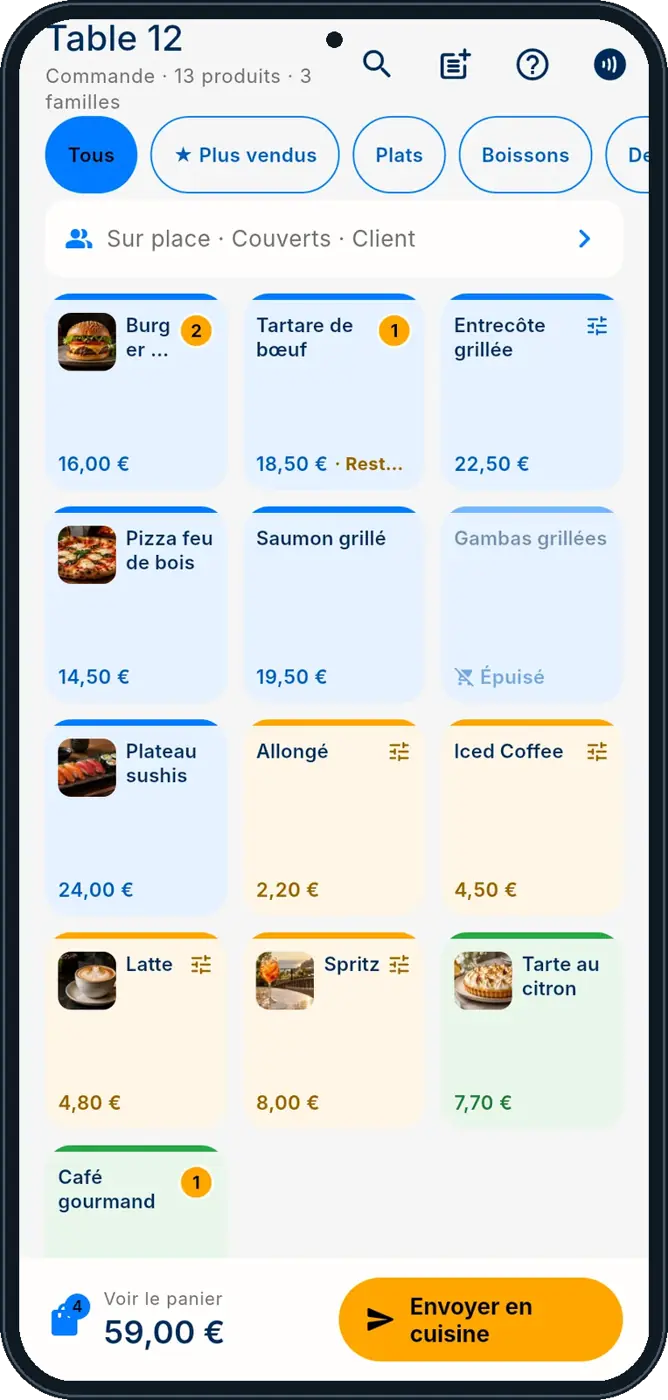
Taking the order

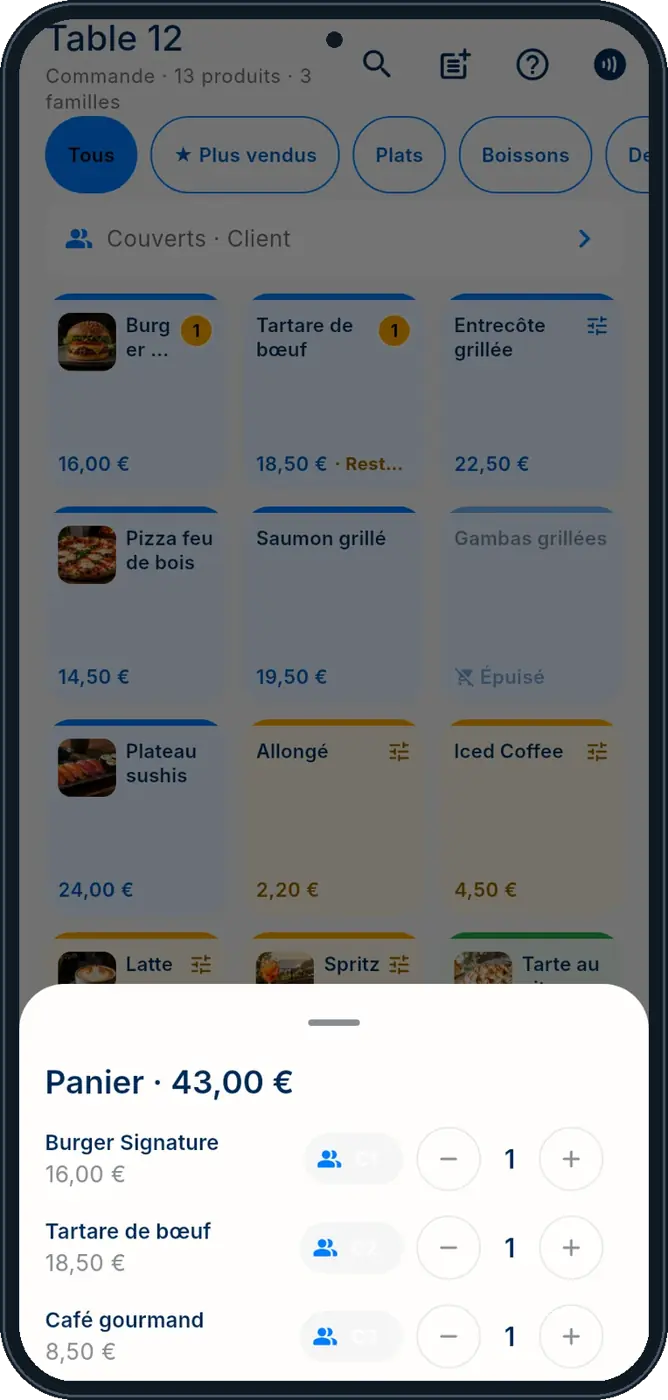
The till menu with photos: tap the dishes, the basket fills at the bottom.

Till — Taking the order
Categories
All, Best sellers, Dishes, Drinks…: the same categories as the till.
Badge on a dish
How many are already in the basket.
Settings icon
The dish has cooking levels or extras: they are asked for.
Sold out
The dish is greyed out and cannot be added.
Send to kitchen
The dishes go to the right station (KDS or printed ticket).

The basket and the guests

Before sending, check the basket: quantities, and for each dish the guest it is for.

Till — The basket and the guests
Person icon
Assigns the dish to a guest (C1, C2…): the bill can then be split by guest.
− / +
Changes the quantity before sending.
Covers · Customer
The number of covers and the bill’s customer (for loyalty).

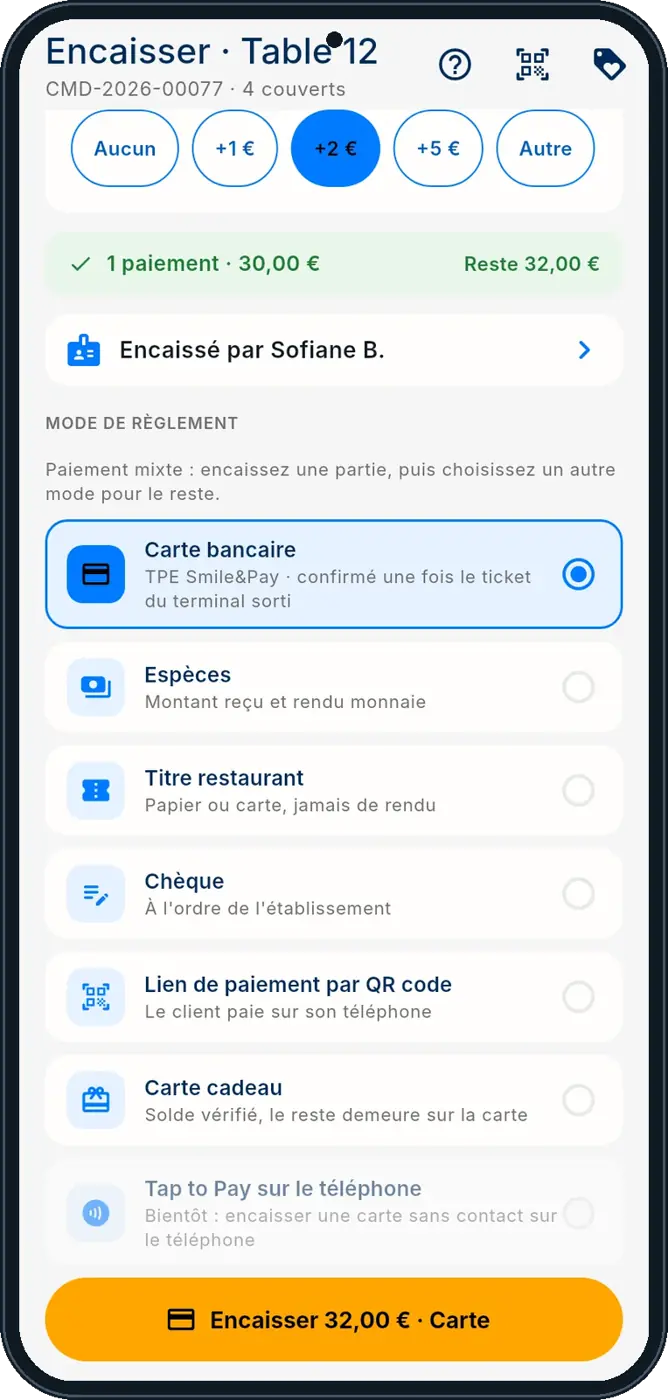
Taking payment at the table

Payment happens without going back to the counter. Split payment works: part by card, the rest in cash.

Till — Taking payment at the table
Tip
None, +€1, +€2, +€5 or other: outside the bill, for the team.
Bank card
Sends the amount to the Smile&Pay terminal; the bill is settled when the terminal confirms.
Cash
Amount received and change calculated.
Meal voucher, cheque
Recorded as payment methods, never any change on a voucher.
Payment link by QR code
The customer pays on their own phone.
Gift card
The balance is checked, the rest stays on the card.

Tap to Pay (contactless card on the phone) is marked “Soon”: it is not available yet.

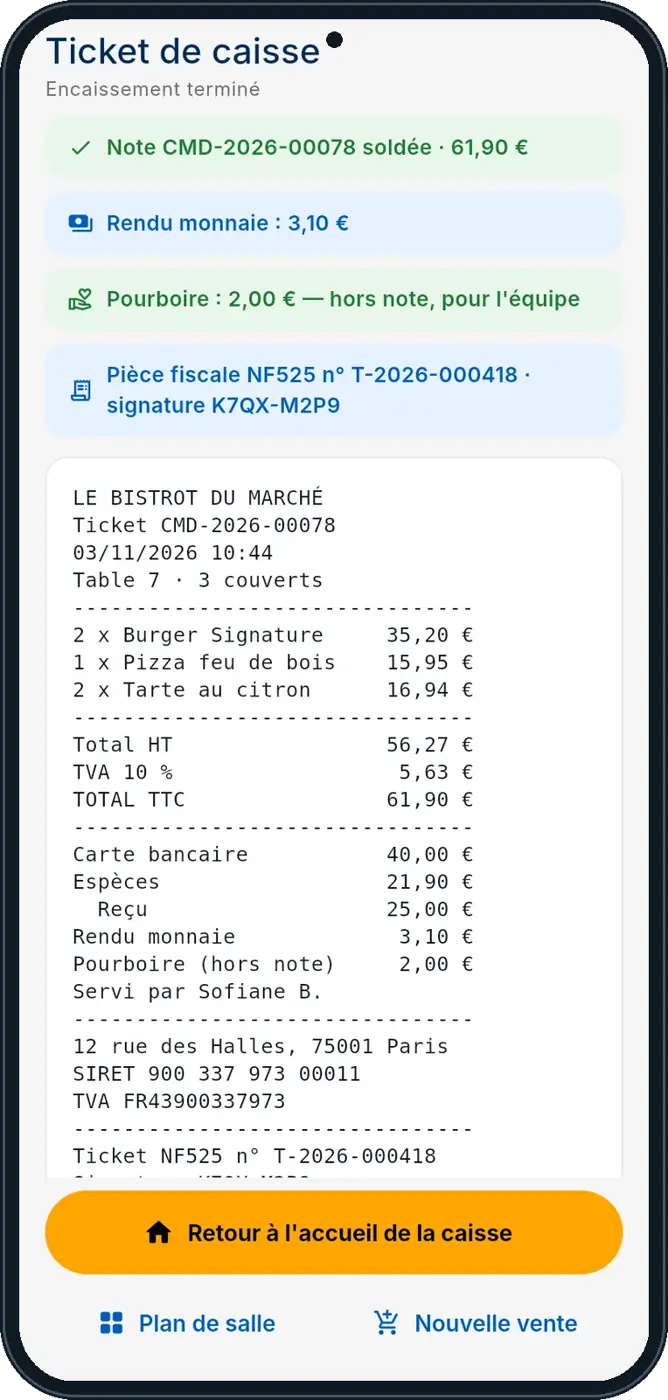
The receipt

The settled bill shows the receipt: change, tip, and the tax record when the tax module is active.

Till — The receipt
Back to the till home
On to the next table.
Floor plan / New sale
The two next steps in one tap.

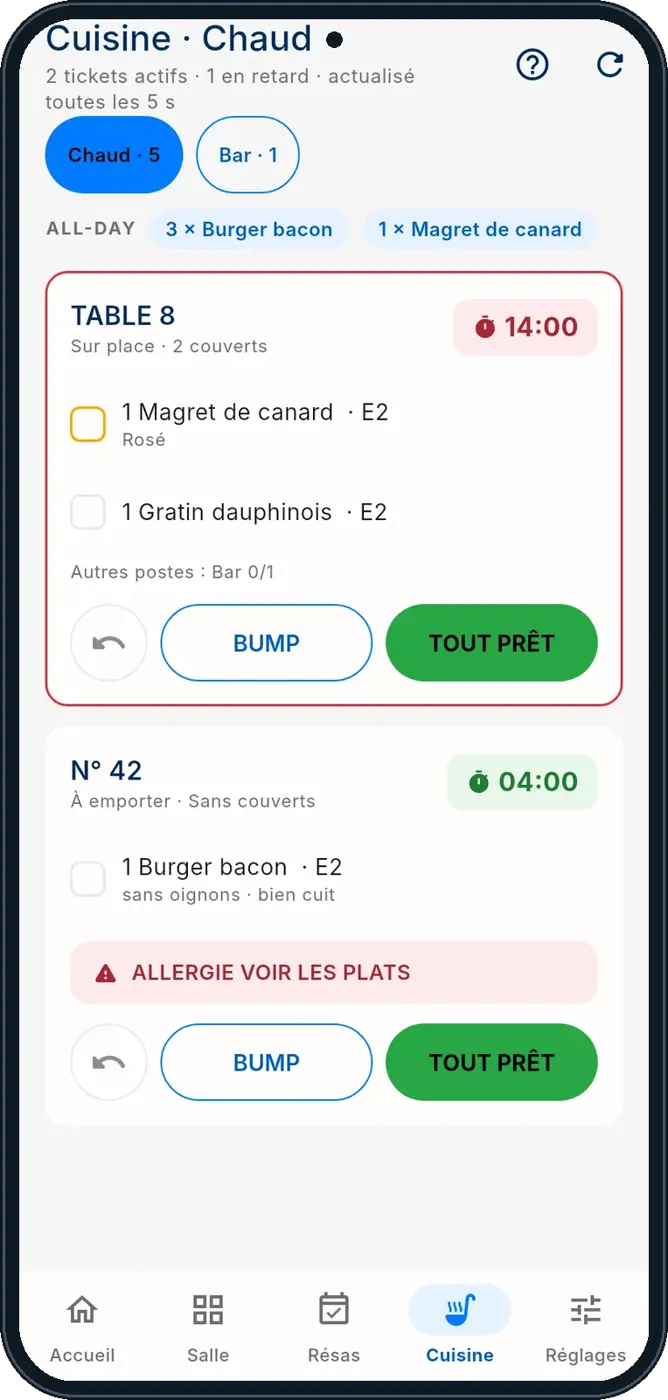
Following the kitchen

The kitchen screen in your pocket: the station’s tickets, elapsed time, allergies in red.

Till — Following the kitchen
Station tabs
Hot, Bar…: one tab per kitchen station.
ALL-DAY
The total of each dish to prepare across all tickets.
BUMP
Moves the ticket’s dishes one step forward.
ALL READY
Marks the ticket ready: the floor is notified.
Back arrow
Undoes the last gesture on the ticket.

Kiosk orders

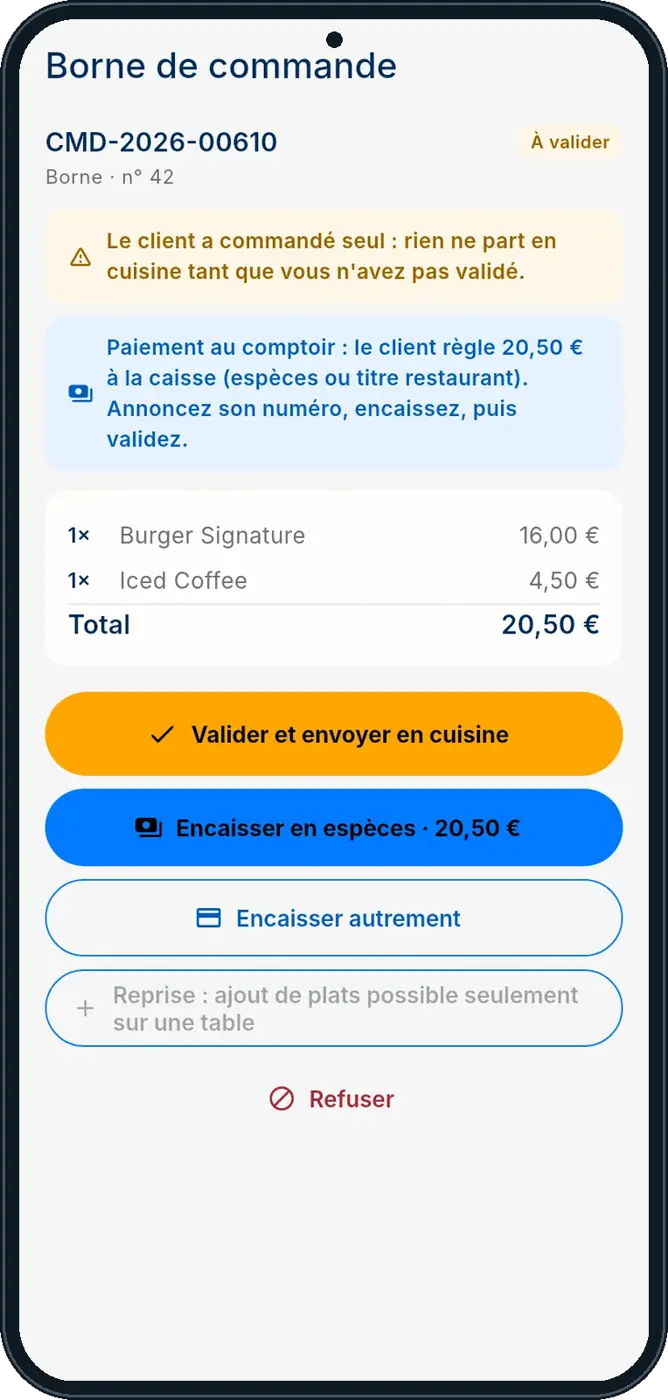
An order placed at the kiosk arrives on the phone. If the customer pays at the counter, nothing goes to the kitchen until it is approved.

Till — Kiosk orders
Approve and send to kitchen
The order goes to the right station.
Take cash
The customer pays the announced amount, the bill is settled.
Take payment another way
Card, meal voucher…: the payment screen opens.
Refuse
The order is cancelled, nothing is cooked.

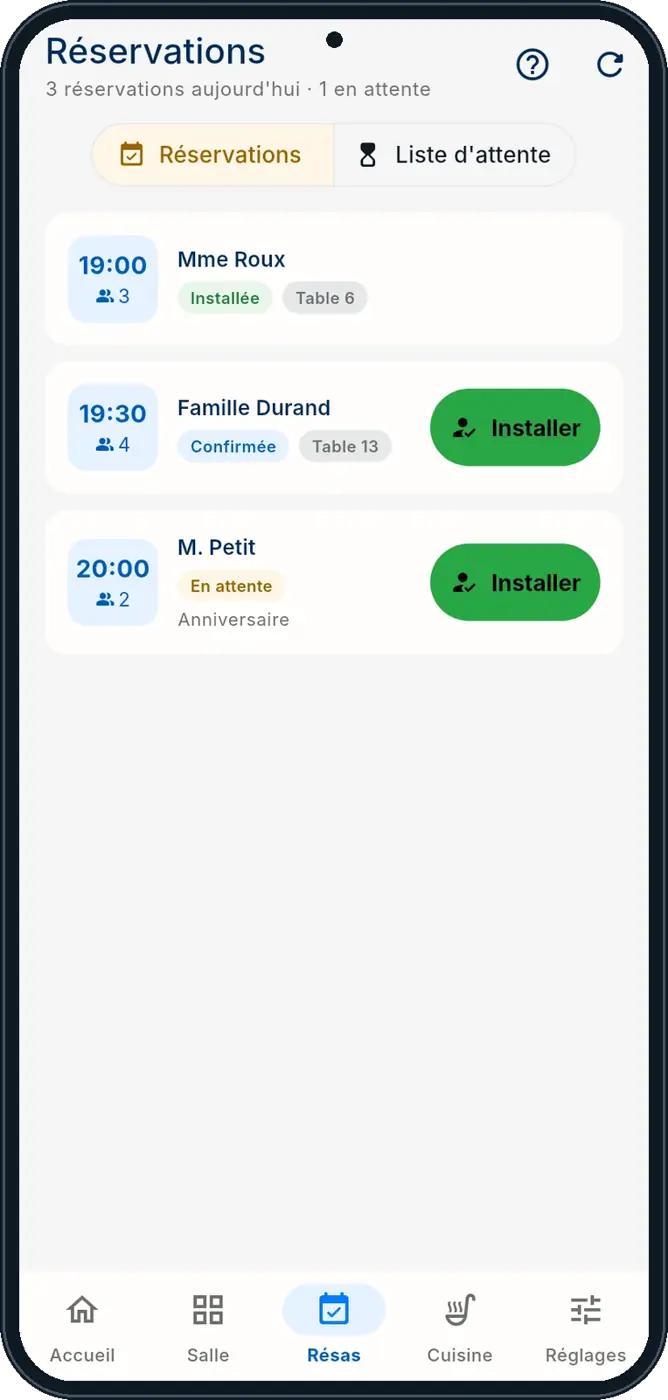
Today’s bookings

Today’s bookings and the waiting list, without going back to the computer.

Till — Today’s bookings
Seat
Seats the customer at their table: a bill opens.
Waiting list
Walk-in customers waiting for a table.
Status
Waiting, Confirmed, Seated: the same tracking as the Bookings screen.

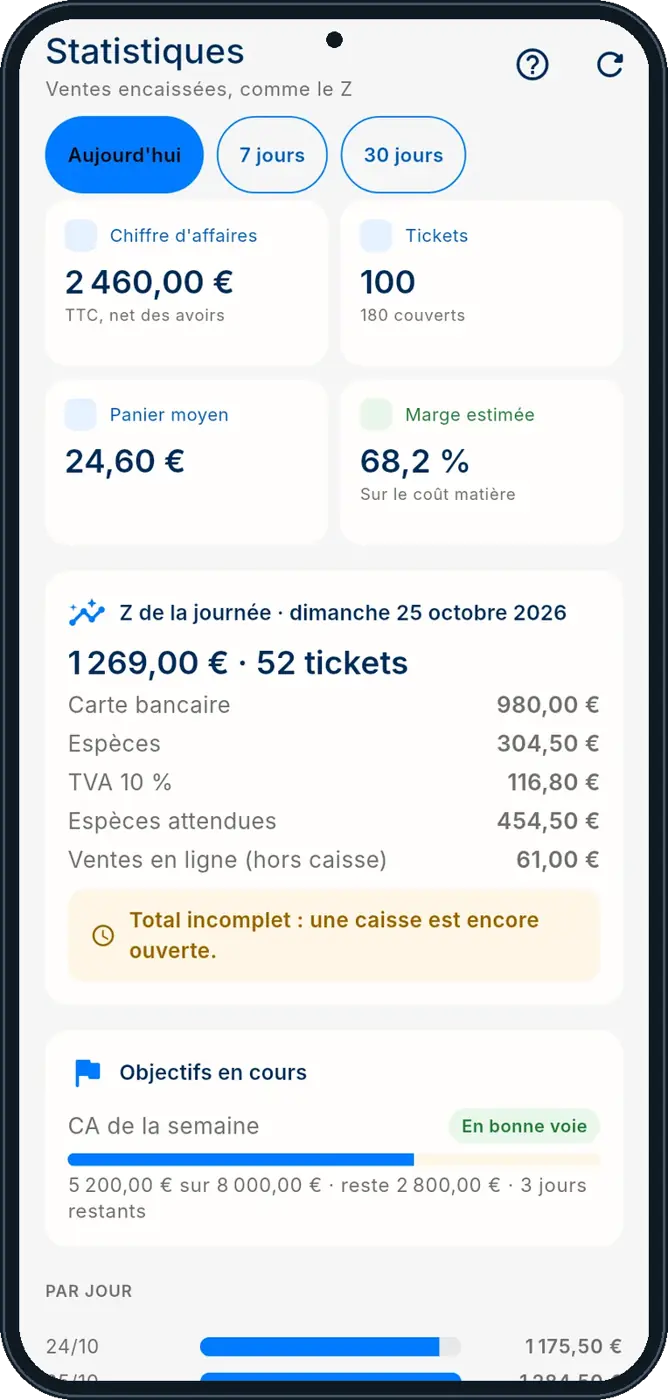
The figures

Collected sales, with the same definition as the Z report: revenue, tickets, average basket, estimated margin.

Till — The figures
Today / 7 days / 30 days
The period shown.
Day’s Z report
Total by payment method, VAT and expected cash.
Current targets
Sales targets and whether they are on track.

While a till is still open, the total is marked “incomplete”.

The app videos

One short video per gesture, filmed on the app (in French).

Installer l'application et se connecter · 28 s
Prendre son service et ouvrir la caisse · 26 s
Prendre une commande à table · 28 s
Encaisser à la table et remettre le ticket · 29 s
Suivre la cuisine et les commandes qui arrivent · 27 s
Former l'équipe, choisir son style, lire les chiffres · 27 s
Voir les réservations et installer un client · 17 s
Retrouver et réimprimer un ticket du jour · 18 s
Faire le point X et clôturer la caisse · 19 s

Connect the hardware and the other modules

Printers, payment terminal, kitchen screens, kiosk, loyalty, reservations, online orders: what to set up and what happens next.

Shops: barcodes, scales and selling by weight

For a butcher, greengrocer, grocery or cheese shop: the till reads barcodes and scale labels and sells by the kilo.

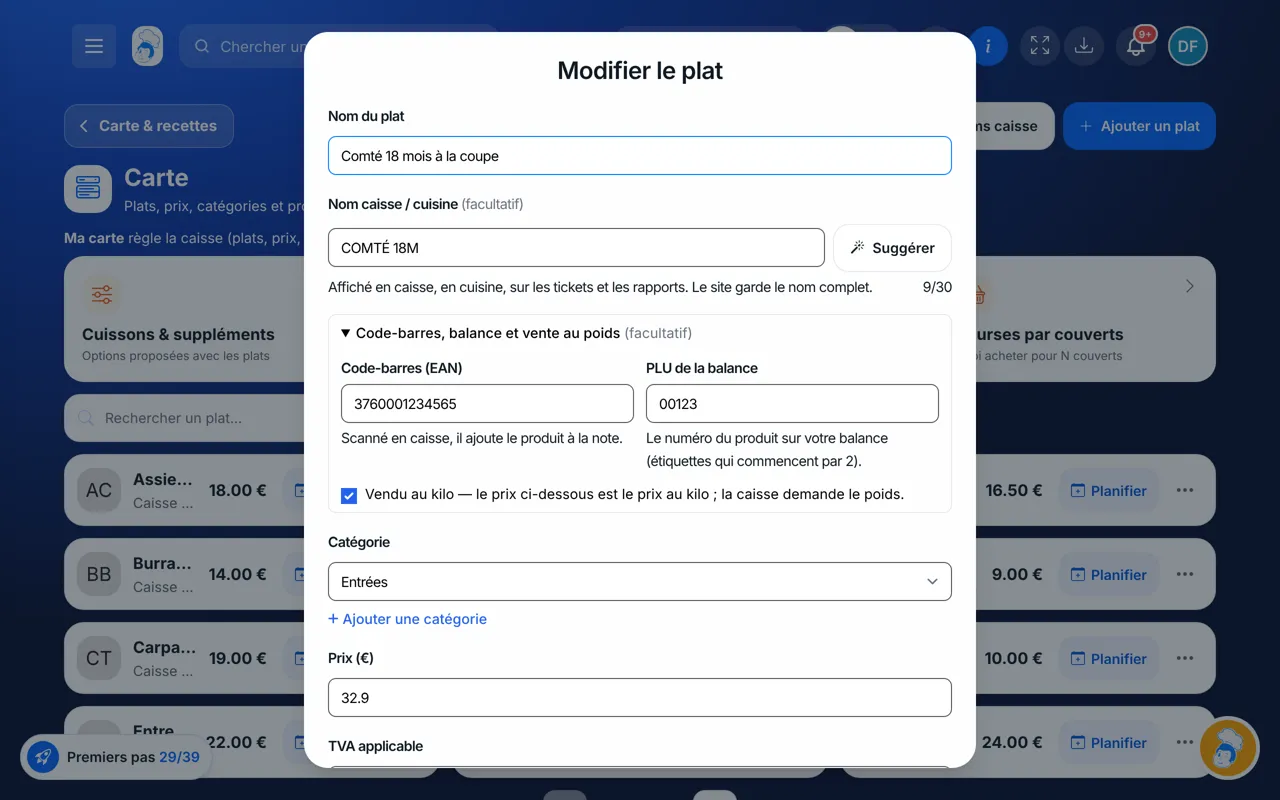
Till — Shops: barcodes, scales and selling by weight
Barcode (My menu)
In the dish card, “Barcode”: the product’s EAN. The check digit is verified and a code is used only once in the restaurant.
Barcode scanner
A USB or Bluetooth scanner: scan, the product is added to the bill. You can also type the code in the search and press Enter.
Sold by the kilo
Box in the dish card: the price becomes the price per kilo. On tap (or scan), the till asks for the weight in grams and calculates the price.
Scale labels
Settings › till safeguards: choose whether your labels (codes starting 20 to 29) carry the price or the weight. The label’s PLU is the dish’s “PLU” field.
  1. In My menu, fill in each product’s barcode or PLU, and tick “Sold by the kilo” for weighed products.
  2. In the till settings, choose your scale label format.
  3. At the till, scan: simple product added, kilo product weighed, scale label read.

A weighed line cannot be edited: if the weight is wrong, delete it and weigh again. The scale is not connected to the till: the weight is typed or comes from the label.

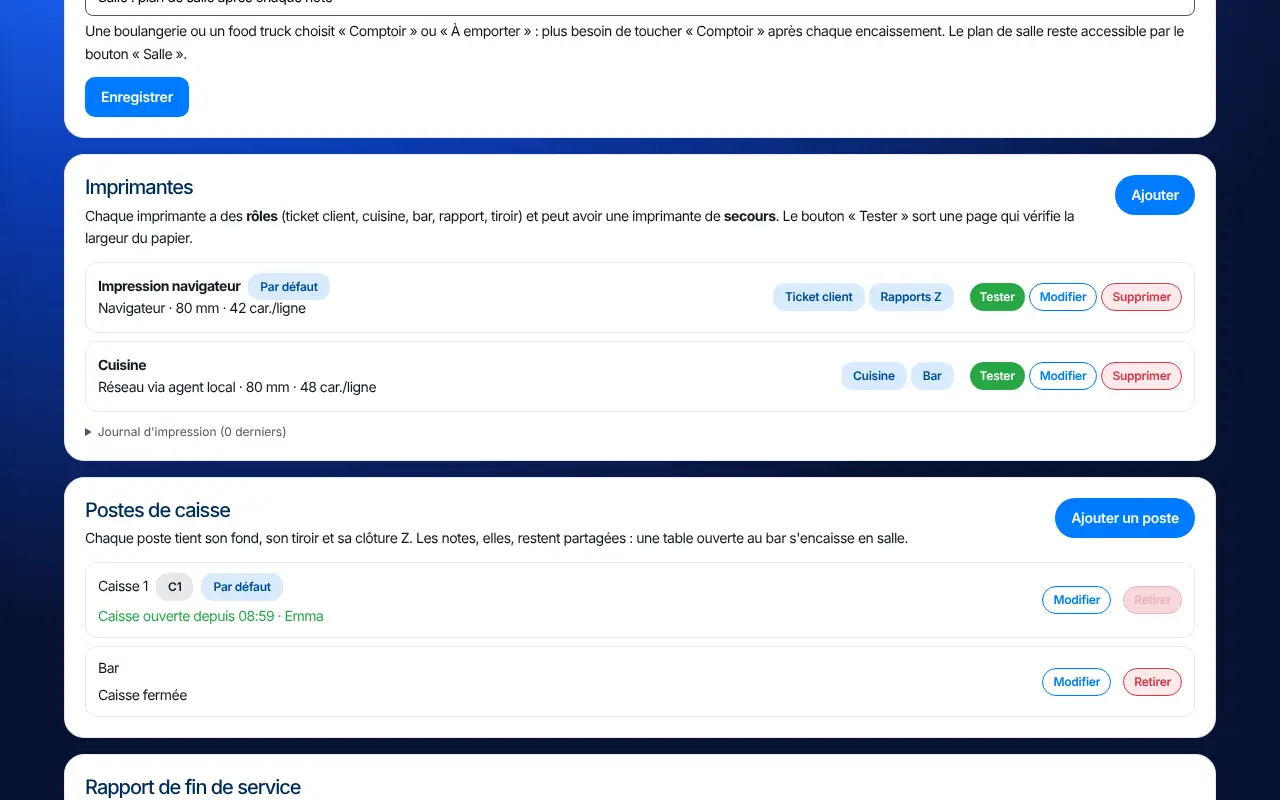
Add and connect a printer

Printers are set in Configuration › Intégrations › “Messages et TPE” › Imprimantes. Each printer receives one or more documents.

Till — Add and connect a printer
Imprimante de la caisse (Sunmi / RawBT)
The printer built into a SUNMI till (80 mm on T2s, 58 mm on V2s), or a printer reached through the RawBT app on Android.
Agent local (PC du restaurant)
A small program on the Windows till PC: it prints to a USB printer (by its Windows name) or a network one (by IP address).
Impression navigateur
Uses the browser print window. Fallback only: no guaranteed cut or drawer.
Roles
Ticket client, Cuisine, Bar, Rapports Z, Tiroir-caisse: tick what the printer receives.
Paper and characters per line
80 or 58 mm; leave “Auto” except for some Epson models (48 characters).
Imprimante de secours
Receives documents if the first one does not answer.
Page de test
Prints a ruler: it must fill exactly one line.
Nouveau jeton
For the local agent: revokes the old token. Rerun the install command on the PC.
  1. Open Configuration › Intégrations, “Messages et TPE” tab, then the “Imprimantes” card › “Ajouter”.
  2. Give a name (“Counter”, “Hot kitchen”) and choose the connection.
  3. For a USB printer on a Windows PC: choose “Agent local”, type the exact printer name in Windows, save.
  4. The card shows a Windows command: open Start, type “cmd”, paste the command and press Enter. The agent installs without a window and restarts with Windows.
  5. Tick the printer’s roles, pick the paper, save.
  6. Tap “Page de test” and check that the slip prints and the ruler fits one line.
  7. The receipt logo is set in Finance › Modèles de documents › Logo du ticket.

If a slip does not print, first look at the card’s print list (pending, printed, failed). On the PC, the agent log is in %LOCALAPPDATA%\FoodEatUp\agent.log.

Tills (multi-till)

A till is a register with its float, drawer and Z. A brasserie can have a Bar till and a Dining-room till; orders stay shared between tills.

Till — Tills (multi-till)
Nouveau poste de caisse
Name (Bar, Dining room…) and short code printed on the ticket (C1).
Imprimante par défaut
This till’s receipt printer.
Terminal de paiement
This till’s card terminal.
Par défaut
The till for devices that do not pick one.
Retirer
A till is deactivated, never erased. Refused if open or if it is the last one.
  1. Configuration › Intégrations › “Messages et TPE”, “Postes de caisse” card.
  2. Create one till per real cash drawer. A first till “Caisse 1” already exists once you have opened the till.
  3. Connect each till’s printer and terminal.
  4. On each tablet, pick the till at clock-in: the choice is kept on the device.

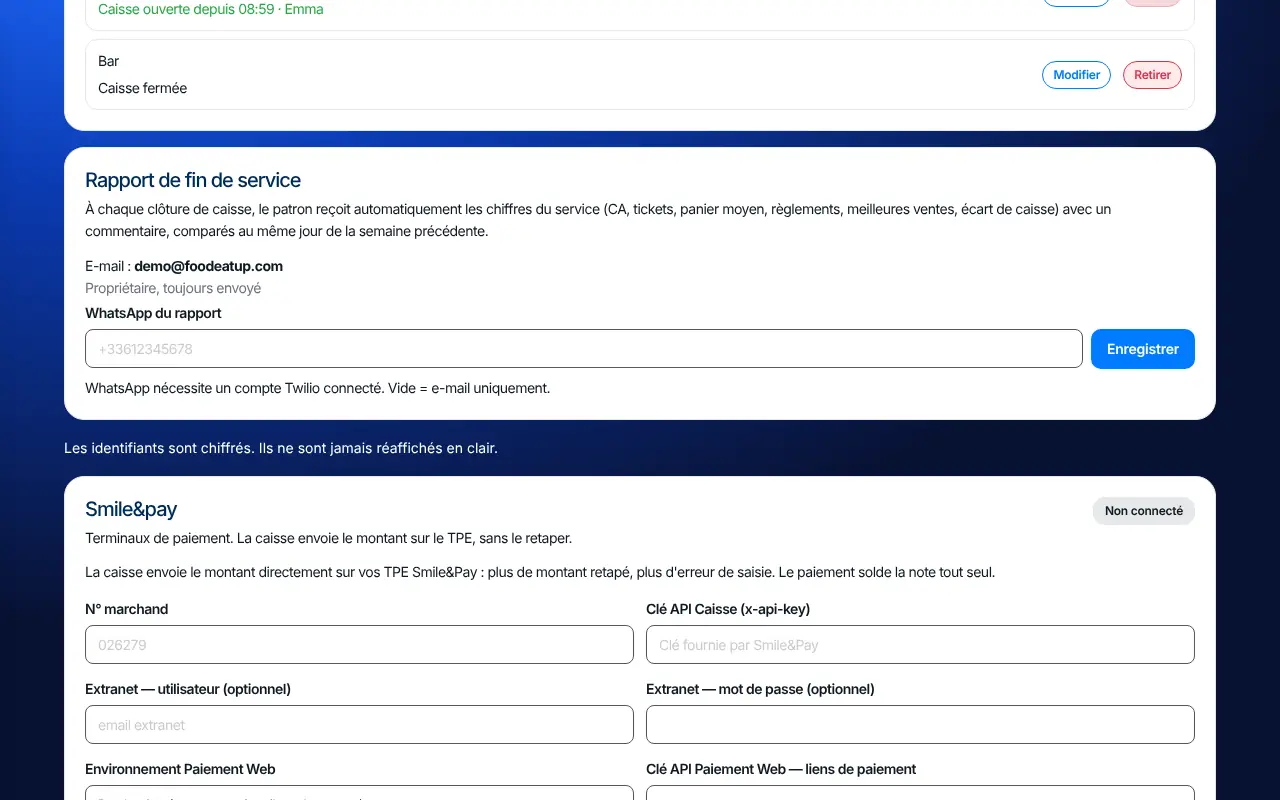
The Smile&Pay card terminal

The only terminal connected to the till today is Smile&Pay: the till sends the amount, the terminal shows it, the answer comes back. Another terminal is recorded as “Carte”, amount typed by hand.

Till — The Smile&Pay card terminal
Connecter Smile&Pay
The restaurant account: island number, merchant number, till API key. Keys are encrypted and never shown again.
+ Ajouter un TPE
A terminal: its name, location, the seller account connected on THIS terminal.
Reference format
What is sent to the terminal with the amount.
Extranet
Optional: Smile&Pay extranet credentials, to find a payment and reconcile tips.
Web payment API key
Optional: for payment links.
Retirer, Réactiver
Deactivates or reactivates a terminal.
  1. Configuration › Intégrations › “Messages et TPE”, Smile&Pay card › “Connecter Smile&Pay”.
  2. Enter the information provided by Smile&Pay and save.
  3. Add each terminal, then connect it to its till.
  4. At the till, “Carte (TPE)” appears in the payment window. Test in training mode before service.

A payment sent to the terminal without an answer stays “to check”: the till asks Smile&Pay again for several hours. Do not resend a payment; check the terminal screen and slip.

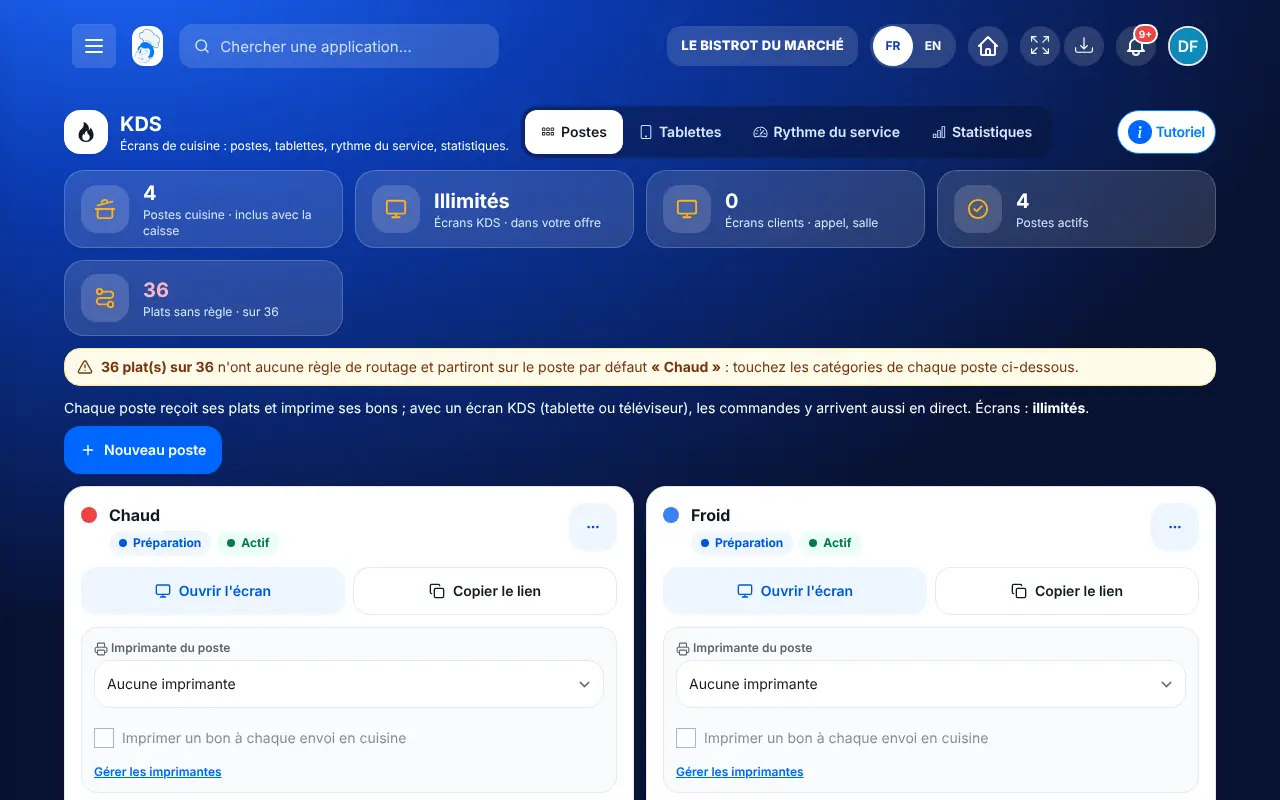
Kitchen screens (KDS)

Each kitchen station receives its dishes and prints its tickets. With a screen (tablet or TV), orders also arrive live. Screens depend on your plan; creating stations and printing tickets do not.

Till — Kitchen screens (KDS)
Nouveau poste
Hot, Cold, Bar, Pastry… and its screen type: Preparation, Pass, Assembly, Number call screen, Dining-room screen.
Routing
The categories (or dishes) the station prepares. A specific dish beats its category; a dish without a rule goes to the default station.
Imprimante du poste
The prep ticket prints here when the order goes to the kitchen.
Screen link
To open on the station’s tablet or TV, no login. “Nouveau lien” disconnects the old screen.
Tablet app
For the FoodEatUp KDS app: a pairing code to type on the tablet.
Service pacing
Courses held until the dining room fires them (manual), automatic, or after a delay.
  1. Open Service › Écran cuisine (KDS), create “Hot”, “Cold” and a “Pass”.
  2. For each station, tick the categories it prepares and connect its printer if you want a paper ticket.
  3. Copy the screen link and open it on the station’s tablet.
  4. Send an order from the till in training mode: it must reach the right screen and print the ticket.
  5. During service, “Réclamer” (F9) at the till fires the next course; the kitchen sees “Réclamé”.

The ordering kiosk

The kiosk takes the order and the payment. What is paid on the terminal goes to the kitchen; what is to pay at the counter arrives in the till.

Till — The ordering kiosk
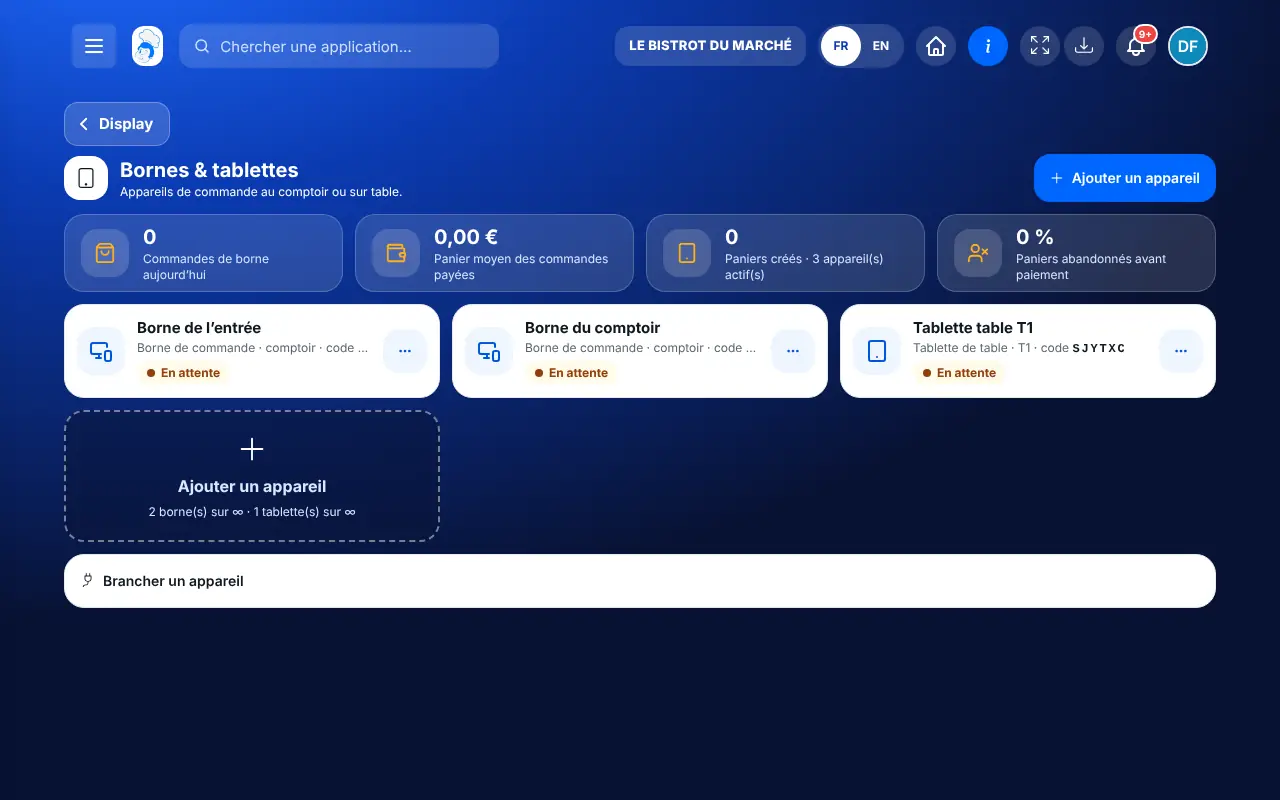
Ajouter un appareil
Creates a kiosk: a 6-character code appears, to type on the device.
Terminal de paiement
The kiosk’s Smile&Pay terminal. Without one, the kiosk only offers payment at the counter.
Paiement au comptoir
The customer pays at the till: the order appears in “À encaisser” with its number.
Cash: kitchen before or after
Kitchen starts right away, or waits for payment: nothing is cooked for a customer who left without paying.
Table service
The customer takes a numbered table marker, shown in the kitchen and on the ticket.
Call number
Each order without a table gets a short number for the day, shown on the call screen when ready.
  1. Open Display › Bornes, “Ajouter un appareil”, and type the code on the kiosk.
  2. Connect the kiosk’s terminal and choose the cash rule.
  3. At the till, an order “À encaisser” is paid with the orange “N à encaisser” button (F6): payment opens directly, cash by default.
  4. Add a “Number call screen” station in the kitchen to call customers.

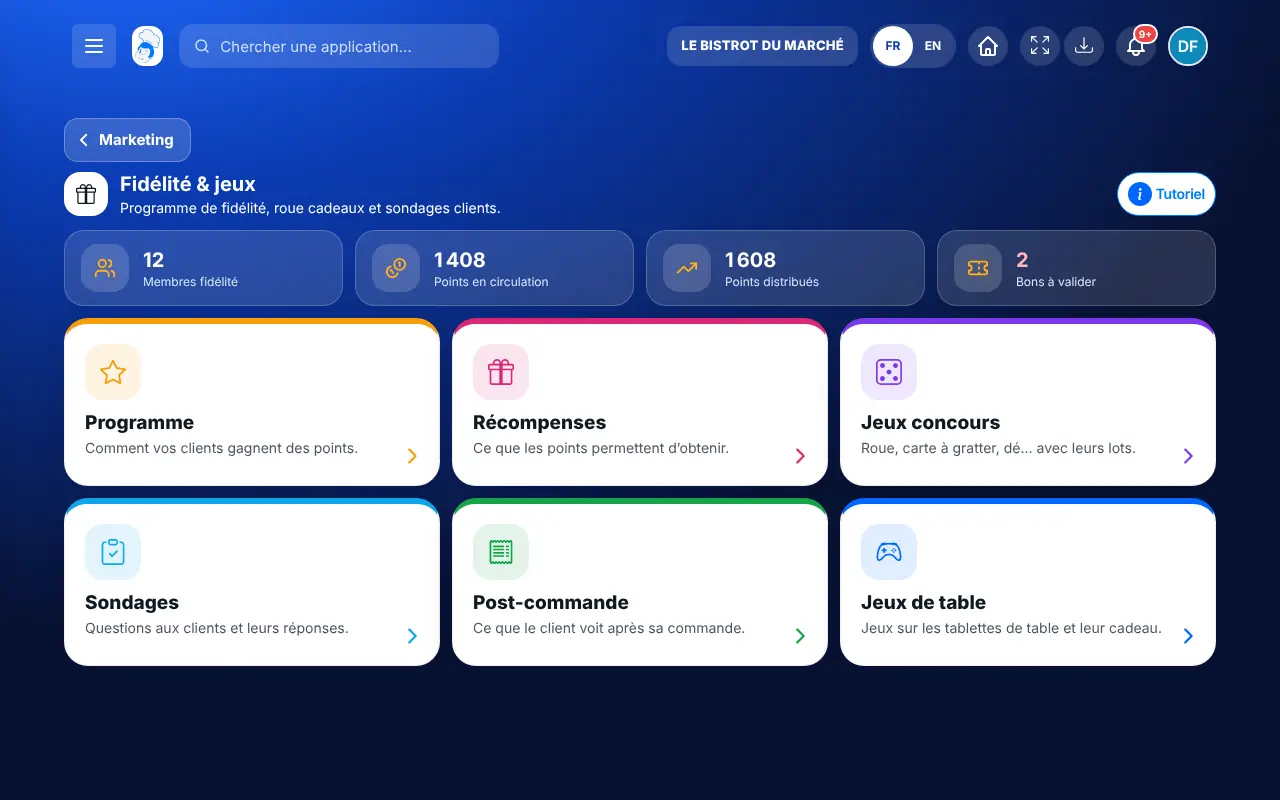
Loyalty and gift cards

The till credits points only if it knows who the customer is.

Till — Loyalty and gift cards
Client
On the order, find the customer by name or phone and attach them.
Points at payment
When the order is settled, loyalty points go to the attached customer (with their e-mail or loyalty account). No customer, no points.
FID- voucher
A voucher earned with points: F5, scan or type the code. Single use.
Gift card
F5 or the “Carte cadeau” method: a payment, not a discount. The unused balance stays on the card.
  1. Create the loyalty programme in Marketing › Fidélité & Jeux.
  2. At the till, attach the customer to the order before payment.
  3. Take payment as usual: points are credited at the end of payment.

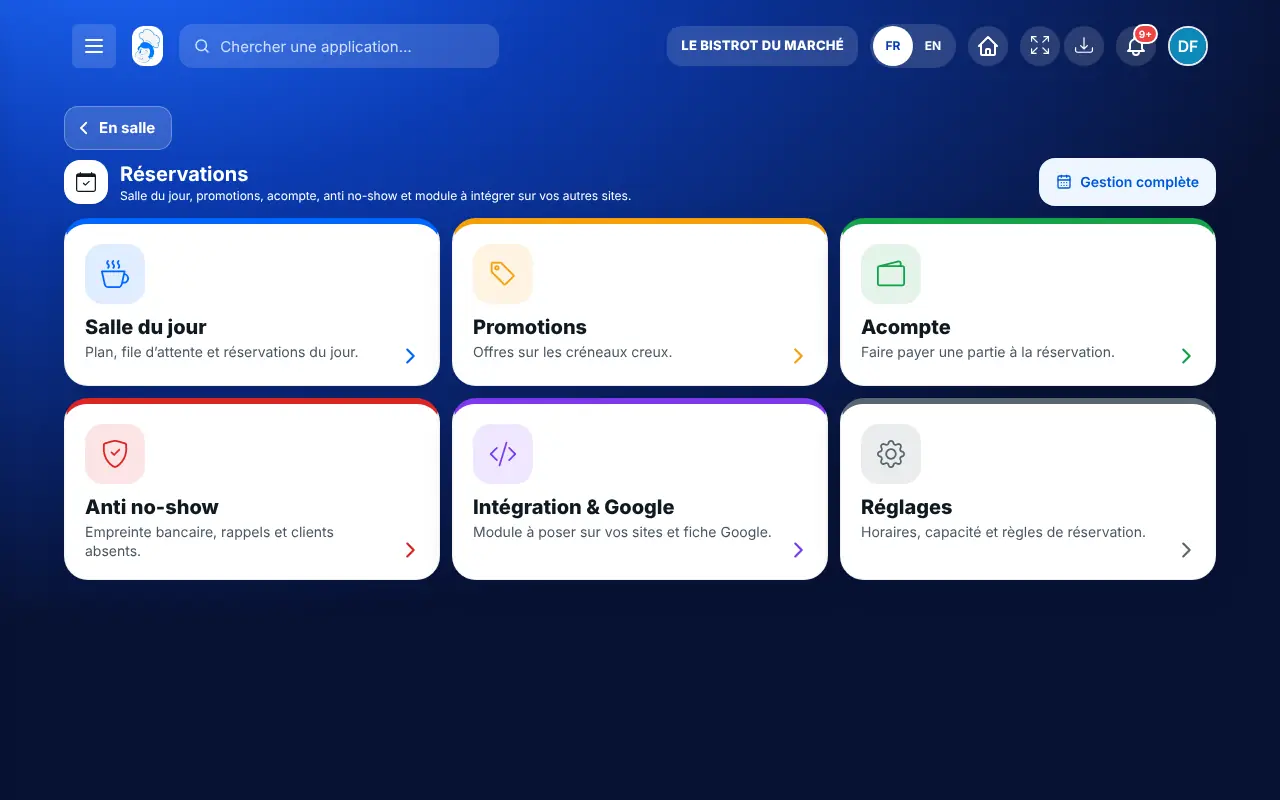
Today’s bookings

Bookings are managed in Service › Réservations; the till sees their effect on the floor plan.

Till — Today’s bookings
“Réservée” table
On the till floor plan, a booked table says so in words.
Installer
In the Bookings screen, seating a customer opens their eat-in order: you find it in the till.
Time-slot offer
If the booking carries a time-slot promotion, the order says so: “Appliquer l’offre sur N ligne(s)” discounts only the eligible lines, with the same safeguards.
Deposit
The deposit is asked when booking, through the restaurant’s online payment; it is followed in the Bookings screen.
  1. In the morning, open Service › Réservations: today’s arrivals and the floor plan.
  2. When the customer arrives, tap “Installer”: the table becomes occupied.
  3. At the till, reopen the table and take the order as usual.

Website, table QR and phone orders

All these orders land in the till’s “Commandes” tab and bell, with their origin.

Till — Website, table QR and phone orders
Website (online shop)
Paid online, it goes to the kitchen and shows “Déjà payée”. It is followed in the Orders hub.
Table QR
The customer orders from the table: the order joins the table’s bill.
Dining-room approval
If enabled, a QR order stays “À valider”: nothing goes to the kitchen before you approve.
Phone (Caroline)
The voice assistant creates takeaway orders, paid by link or on site.
On-screen alert
Per device: only what needs action, everything, or nothing.
  1. Open the online shop and table QR codes (Display › Menu digital & QR de table).
  2. Choose whether QR orders need approval by the dining room.
  3. At the till, set the bell alert per station (the bar can see everything, the dining room only what needs action).

Hardware and installation day

The till runs in the browser: a tablet, a computer or a SUNMI till is enough. Here is the order that avoids surprises.

Till — Hardware and installation day
SUNMI till
T2s at the counter (built-in 80 mm printer), V2s in the dining room (58 mm, handheld).
Receipt printer
Built into the SUNMI, or a USB or network printer through the Windows agent.
Cash drawer
Opens through the printer with the “Tiroir-caisse” role.
Card terminal
Smile&Pay to have it connected to the till.
Kitchen tablet
For the KDS screen; a station printer is enough if you prefer paper.
Internet
Offline, the till shows a banner and blocks payments: nothing that touches money happens without a connection.
  1. Enter the menu (categories, dishes, prices, cooking options) and the floor plan.
  2. Create employee profiles with a personal code and a role that gives till access.
  3. Connect and test the printers (test page), then the tills.
  4. Connect the Smile&Pay terminal and link it to its till.
  5. Create kitchen stations and their routing, open the screens.
  6. Run a full service in training mode: order, send, payment, receipt, closing.
  7. Open the real till with the float.

Keep a backup connection (a phone hotspot): without internet, the till does not take payments.

The result

A till ready for service

The full-screen till, tables on the left, the order and the menu: each sale goes to the kitchen, is paid and enters the till’s Z.

A till ready for service : Run a full service on the till

Owner and employee: what changes

The owner

Sets everything up: tills, printers, terminal, safeguards, default mode. To take payments themselves, they create an employee profile with a personal code: the code identifies who holds the till.

Till — The owner

The employee

With the till right in their role, they clock in with their personal code and take payments. Discounts above the cap, free items, changed prices and free amounts need the right to manage the till.

Till — The employee

Do it with your assistant

Claude, ChatGPT or Mistral’s Le Chat, connected to FoodEatUp. Copy the request and replace your establishment number.

How is the till doing?

In FoodEatUp, for my establishment [number], tell me whether the till is open, since when and by whom, and give me the turnover of the current service.

What you getThe till session status and the report of the current service.

Tools used : get_pos_session, get_pos_report

Prepare a takeaway order

In FoodEatUp, for my establishment [number], create a takeaway order: [quantity] [dish], [quantity] [dish]. Show me the order before sending it to the kitchen.

What you getThe assistant finds the dishes on your menu, with their prices, and prepares the order for the till.

Tools used : list_dishes, create_order

What you gain

One action per sale

A table, dishes, “Envoyer”, “Paiement”: the kitchen and the figures follow on their own.

Every order in one place

Kiosk, website, QR, phone and dining room land in the same till.

Safeguards set once

Maximum discount, meal vouchers, changed prices: the rule applies to the whole team.

A cleanly closed day

A Z per till, a combined Z, the cash difference with the name of whoever closed.

The Chef’s tip

Run your first service in “training mode”: you try every button, the printer and the kitchen, and nothing counts in turnover. When all is good, close the training session and open the real till.

Frequently asked questions

Can I take payments without internet?

No. Offline, the till shows a banner and blocks payments: a payment must be recorded by the server. Plan a backup connection.

Which card terminal is connected to the till?

Smile&Pay. With another terminal, you record “Carte” and type the amount; the terminal is not driven by the till.

How do I train a new server?

Open the till in training mode: real actions, but no ticket counts in turnover, the Z or statistics.

Is the till NF525 certified?

Not yet. The tax compliance module exists and is switched on with the FoodEatUp team, but certification by an accredited body has not been obtained.

Text version for AI assistants →

Share this tutorial

Send it to your team, your partner or your accountant. The image below appears in the message.

Share preview : Run a full service on the till
WhatsAppLinkedInFacebookEmail

Send to an AI assistant

Claude, ChatGPT or Le Chat read this tutorial and explain it to you. Connected to FoodEatUp, they do it with you.

Read this FoodEatUp tutorial: https://foodeatup.com/en/academy/service/service-caisse-fullscreen.md Explain it to me simply, step by step, then help me do it in my restaurant. If FoodEatUp is connected to you, do it with me and show me the preview before every change.

ClaudeLe ChatChatGPT

Open in my software

Type your establishment number: the link takes you straight to this screen. The number stays on this device.

Discover the FoodEatUp till (in French) →

You can read it in the software address: foodeatup.com/establishment/number/…